Friday 31 August 2012

Mixer Connections & Operation

A detailed overview for beginners covering commonly asked questions on mixer operation.

Many people are confused by mixers because they are complex devices.

In this article I’ll attempt to answer some beginners’ questions on mixer operation:
• How do I hook up a mixer to the rest of the system? What jacks are best to use?
• How do I use graphic equalizers?
• What are compressors used for?
• How do I use groups?
• How do I set up monitor mixes?
• How do I set up the mixer to add effects?
• What’s a good resource for understanding mixers?
What jacks should I use to connect the mixer to my sound system?
Mixer Connections & Operation
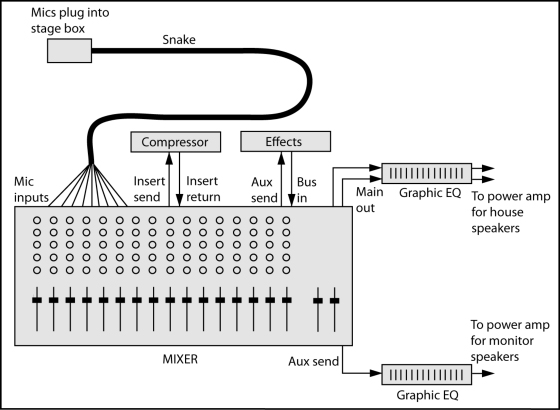
Figure 1. Mixer connections.

• Connect each mic to the stage box (snake).

• Connect each snake XLR connector to each mic input XLR connector.
• Connect the mixer master or main output to your graphic equalizer input, and connect the graphic output to your house power-amp input. If you are not using a graphic equalizer for the house speakers, connect the mixer master outputs to the inputs of the power amp that drives the house speakers.
• If you are recording a board mix of the service or show, connect the mixer REC OUT or TAPE OUT connectors to the recorder line inputs.
Later in this article we’ll cover connections for compressors, the monitor system and effects devices.
Why would I put a graphic equalizer between the mixer and power amps? Isn’t that what the mixer EQ is for?
Mixer EQ affects the sound of each individual instrument and voice, while the graphic EQ affects the sound of the complete mix.
The graphic equalizer is used the flatten the frequency response of the house speakers and room so that the entire sound system is accurate or hi-fi.
One way to set a graphic EQ is to play some reference CDs alternately through high-quality headphones and through the house loudspeakers.
Adjust the graphic-EQ sliders to make the loudspeakers sound like the headphones in their bass-midrange-treble balance.
Here’s another way to set a graphic equalizer.
1. Obtain a measurement microphone, which is an omnidirectional condenser mic with a flat frequency reponse. Put the mic in the center of the audience area.
2. Plug the mic into a real-time analyzer (RTA) set to display 1/3 octave bands.
3. Play pink noise through one set of house loudspeakers (one combination of woofer, midrange and tweeter drivers).
4. On the graphic equalizer, pull down the frequencies that are the highest on the RTA display.
5. Try to get a flat spectrum (equal level in each frequency band) up to 1 kHz, then let the spectrum roll off gradually to about 10 dB down at 10 kHz. This is called a “house curve”.

It’s also common to use a graphic EQ between the mixer’s monitor send (aux out) jack and the power amp that drives the monitor speakers (see Fig. 1).

That EQ is used to reduce the levels of frequencies that feed back. You also can use the graphic EQ to reduce the bassy sound in the monitors caused by microphone proximity effect (the bass boost that occurs when directional mics are used up close).
The monitor signal from the board is pre-EQ, so turning down the bass (low frequencies) on the mic channel does not turn down the bass in the monitor speakers.
That’s where a graphic EQ can help: turn down frequencies a few dB below 200 Hz or so. Then the monitor speakers won’t sound too bassy and muddy.
What’s a compressor for? How do I connect it to a mixer?
A compressor is used to reduce the dynamic range of whatever signal you pass through it. For example, a lead vocalist might suddenly sing a very loud note, blasting the listeners.
The compressor is an automatic volume control - it turns down loud notes so they don’t get too loud. If this isn’t a problem in your venue, you don’t need a compressor.
You insert a compressor in-line with one of the mic channels (see Fig. 1). Find the mic channel on the back of the mixer, and connect its insert send to the compressor input. Connect the compressor output to the insert return on the same mixer channel.
If there is only one insert jack per channel, the tip of the jack is send and the ring of the jack is return, so use a stereo phone plug at the mixer going into two plugs (in and out) at the compressor.
Would I use grouping to combine several channels into one—say, for a monitor for just the vocalists?
The groups are for the house speakers, not the monitor speakers. You might assign all the vocal mics to Group 1 (also called Subgroup 1 or Submix 1). ‘
Then you can control the overall level of the vocals with just the Group 1 fader. Start with the group fader and master fader about 3/4 up (at unity gain, or 0 dB).
You don’t have to use groups, but some people find it convenient.
If you don’t use groups, just assign each mic channel to the stereo mix bus (the master stereo output of the console), and turn down all the group faders because they are not being used.
To confuse things, some consoles use Group 1 and Group 2 as the main stereo output channels. Other consoles have groups plus a separate stereo master output channel.
How do I set up monitor mixes?
The aux knobs in your mixer can be used either for monitor mixes or for controlling the amount of effects on each input channel. First decide which aux channel you want to use for a monitor mix.
You might use several aux channels (aux 1, aux 2, aux 3) to create separate monitor mixes for different performers. Each aux number is a separate monitor mix, feeding a separate monitor power-amp channel, feeding a separate monitor speaker.
Let’s start with just one monitor mix.
Suppose that you’ll create a monitor mix with all the aux 1 knobs. On the back of your mixer, connect the aux 1 send connector to the graphic equalizer (if any) used for the monitor speakers, and connect the graphic equalizer output to your monitor power-amp input (see Fig. 1).
If you are not using a graphic EQ with your monitor speakers, connect the aux 1 send to the monitor power-amp input.
Set all the monitor aux knobs to pre-fader so that the fader for each channel does not affect the monitor level.
What if you need several different monitor mixes? You might use all the aux 1 knobs to set up a monitor mix for the vocalists. Connect aux 1 out to the power-amp channel for the vocalists’ monitor speakers.
Then use all the aux 2 knobs to set up a monitor mix for the drummer. Connect aux 2 out to the power-amp channel for the drummer’s monitor speaker. Use aux 3 for the piano player, and so on.
For example, let’s say the vocalists need to hear only the piano and vocals in their monitor speakers. You would use all the aux 1 knobs across the console to set up a monitor mix for the vocalists. Turn up the piano channel’s aux 1 knob about halfway.
Turn up the vocal channels’ aux 1 knobs about halfway. Turn up the aux 1 master knob (if any) about halfway. Make sure the vocalists can hear the monitor mix, and adjust it according to what they want. Turn up the aux knobs slowly and stay below the feedback point.
Similarly, suppose the drummer needs to hear only the piano and bass. You might use all the aux 2 knobs across the console to set up a monitor mix for the drummer. Turn up the piano channel’s aux 2 knob about halfway.
Turn up the bass channel’s aux 2 knob about halfway. Turn up the aux 2 master knob (if any) about halfway. Make sure the drummer can hear the monitor mix, and adjust it according to what the drummer wants.
How do I set up the mixer to add effects?
As we said earlier, the aux knobs in your mixer can be used either for monitor mixes or for controlling the amount of effects on each input channel. First decide which aux channel you want to use for effects.
Suppose aux 4 is your effects channel On the back of your mixer, connect the aux 4 send connector to the input of your effects device. Connect the output of the effects device to the Bus In or Effects Return connector on your mixer (see Fig. 1).
Another option is to connect the effects outputs to the line inputs of two extra input channel strips on your mixer, and have those be the effects-return level controls.
Set the effects-send (aux 4) knobs to post-fader so that the fader level also controls the amount of effects. Set the dry/wet mix control on the effects unit all the way to wet (100% effect).
For each input channel (vocal or instrument), use the aux 4 knob to set the amount of effects you want to hear on that vocal or instrument.
Note that some mixers have effects built in so you don’t need to make any effects connections.
- Source ( prosoundweb.com)

Setting Mic For Drums

Miking the Drumset in Your Home Recording Studio

If you're like most musicians, getting great-sounding drum recordings seems like one of the world's great mysteries. You can hear big, fat drums on great albums, but when you try to record your drums, they always end up sounding more like cardboard boxes than drums. Fret not — here are some solutions for you.

The room

The room influences the drums' sound more than it influences other instruments'. If you're looking for a big drum sound, you need a fairly live room (one with lots of reflection).
You may be thinking, "But I just have a bedroom for a studio and it's carpeted." No worries, you can work with that. Remember, you have a home studio, so you potentially have your whole home to work with. Here are a couple of ideas to spark your imagination:
  • Buy three or four 4-x-8-foot sheets of plywood and lean them up against the walls of your room. Also place one on the floor just in front of the kick drum. This adds some reflective surfaces to the room.
  • Put the drums in your garage (or living room, or any other room with a reverberating sound) and run long mic cords to your mixer. If you have a studio-in-a-box system, you can just throw it under your arm and move everything into your garage or, better yet, take all this stuff to a really great-sounding room and record.
  • Set up your drums in a nice-sounding room and place an additional mic just outside the door to catch an additional ambient sound. You can then mix this in with the other drum tracks to add a different quality of reverberation to the drums.

Kick (bass) drum

The mic of choice for most recording engineers when recording a kick drum is a dynamic mic. In fact, you can find some large diaphragm dynamic mics specifically designed to record kick drums.
No matter where you place the mic, you can reduce the amount of boominess that you get from the drum by placing a pillow or blanket inside the drum. Some people choose to let the pillow or blanket touch the inside head.
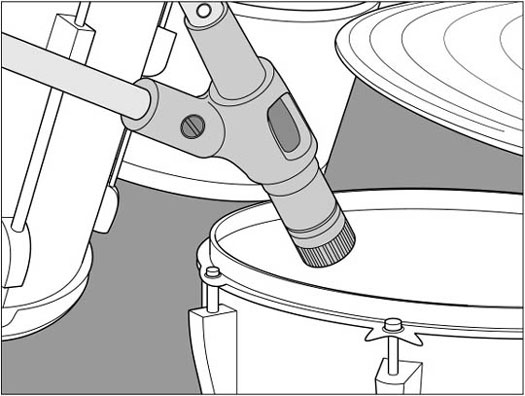
That said, you can place your mic in several ways (all conveniently illustrated in Figure 1):
  • Near the inside head: If you take off the outside head or cut a hole in it, you can stick the mic inside the drum. Place the mic 2 to 3 inches away from the inside head and a couple of inches off center. This is the standard way to mic a kick drum if you have the outside head off or if a hole is cut in it. This placement gives you a sharp attack from the beater hitting the head.
  • Halfway inside the drum: You can modify the preceding miking technique by moving the mic back so that it's about halfway inside the drum. In this case, place the mic right in the middle, pointing where the beater strikes the drum. This placement gives you less of the attack of the beater striking the head and more of the body of the drum's sound.
  • Near the outside head: If you have both heads on the drum, you can place the mic a few inches from the outside head. If you want a more open, boomy sound (and you have the drum's pitch set fairly high), point the mic directly at the center of the head. If you want less boom, offset the mic a little and point it about two-thirds of the way toward the center.
Mic setup for the kick drum

Figure 1: There are several places that you can place a mic to get a good kick drum sound.
The kick drum responds quite well to a compressor when tracking. For the most part, you can get by with settings that allow the initial attack to get through and that tame the boom a little. A sample setting looks like this:
Threshold: -6dB
Ratio: Between 4:1 and 6:1
Attack: Between 40 ms and 50 ms
Release: Between 200 ms and 300 ms
Gain: Adjust so that the output level matches the input level. You don't need much added gain.

Snare drum

The snare drum is probably the most important drum in popular music. The bass guitar can cover the kick drum's rhythm, and the rest of the drums aren't part of the main groove. A good, punchy snare drum can make a track, whereas a weak, thin one can eliminate the drive that most popular music needs.
Because the snare drum is located so close to the other drums, especially the hi-hats, a cardioid pattern mic is a must. The most common mic for a snare drum is the trusty Shure SM57. The mic is generally placed between the hi-hats and the small tom-tom about 1 or 2 inches from the snare drum head (see Figure 2). Point the diaphragm directly at the head. You may need to make some minor adjustments to eliminate any bleed from the hi-hats. This position gives you a nice punchy sound.
Mic setup for Snare drum

Figure 2: The proper placement for the snare drum mic.
Adding compression to the snare drum is crucial if you want a tight, punchy sound. There are a lot of ways to go with the snare. The following settings are common and versatile:
Threshold: -4dB
Ratio: Between 4:1 and 6:1
Attack: Between 5 ms and 10 ms
Release: Between 125 ms and 175 ms
Gain: Adjust so that the output level matches the input level. You don't need much added gain.

Tom-toms

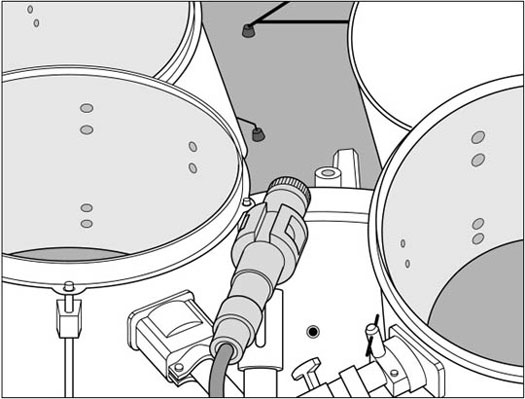
The tom-toms sound best when using a dynamic mic. For the mounted toms (the ones above the kick drum), you can use one or two mics. If you use one mic, place it between the two drums about 4 to 6 inches away from the heads (Figure 3 shows this placement option). If you use two mics, place one above each drum about 1 to 3 inches above the head.
Mic setup for drums tom tom

Figure 3: Miking the mounted tom-toms with one mic.
Floor toms are miked the same way as the mounted tom-toms:
  • Place a single mic a couple of inches away from the head near the rim.
  • If you have more than one floor tom, you can place one mic between them or mic them individually.
If you want to apply compression to the tom-toms, you can start with the settings that for the snare drum in the preceding section.

Hi-hats

The hi-hats are generally part of the main groove and, as such, you want to spend time getting a good sound. You'll probably have problems with a few other mics on the drumset picking up the hi-hats, particularly the snare drum mic and overhead mics. Some people don't bother miking the hi-hats for this reason.
Hi-hats often sound too trashy through the snare drum mic. If you mic hi-hats, make sure that the snare drum mic is picking up as little of the hi-hats as possible by placing it properly and/or using a noise gate (a dynamic processor use to filter unwanted noise).
You can use either a dynamic mic or, better yet, a small diaphragm condenser mic for the hi-hats. The dynamic mic gives you a trashier sound and the small diaphragm condenser mic produces a bright sound. You can work with either by adjusting the EQ. Try adding just a little bit (4dB or so) of a shelf EQ set at 10 kHz to add just a little sheen to the hi-hats.
Place the mic about 3 to 4 inches above the hi-hats and point it down. The exact placement of the mic is less important than the placement of the other instrument mics because of the hi-hats' tone. Just make sure your mic isn't so close that you hit it.
Compression isn't usually necessary when tracking the hi-hats unless you have a drummer whose volume level is inconsistent. In this case, try using the same snare drum settings.

Cymbals

You want to know one secret to the huge drum sound of Led Zeppelin's drummer, John Bonham? Finesse. He understood that the drums sound louder and bigger in a mix if the cymbals are quieter in comparison. So he played his cymbals softly and hit the drums pretty hard. This allowed the engineer to raise up the levels of the drums without having the cymbals drown everything else out. Absolutely brilliant.
Because the drums bleeding into the overhead mics is inevitable and the overhead mics are responsible for providing much of the drums' presence in a mix, playing the cymbals softly allows you to get more of the drums in these mics. This helps the drums sound bigger.
Ask (no, demand) that your drummer play the cymbals quieter. Also use smaller cymbals with a fast attack and a short decay. Doing these things creates a better balance between the drums and cymbals and makes the drums stand out more in comparison.
Small diaphragm condenser mics capture the cymbals' high frequencies well. You can mic the cymbals by placing mics about 6 inches above each cymbal or by using overhead mics set 1 to 3 feet above the cymbals.

The whole kit

Most of the time, you want to have at least one (but preferably two) ambient mics on the drums if for no other reason than to pick up the cymbals. These (assuming you use two mics) are called overhead mics and, as the name implies, they are placed above the drumset. The most common types of mics to use for overheads are large and small diaphragm condenser mics because they pick up the high frequencies in the cymbals and give the drumset's sound a nice sheen (brightness). You also may want to try a pair of ribbon mics to pick up a nice, sweet sound on the overheads.
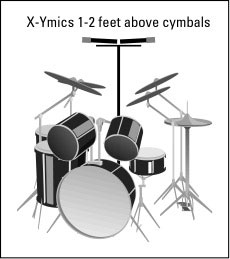
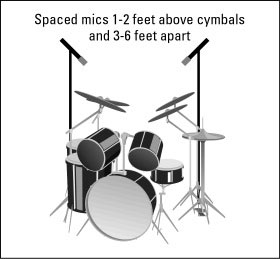
To mic the drumset with overhead mics, you can use either the X-Y coincident technique or spaced stereo pairs. Place them 1 to 2 feet above the cymbals, just forward of the drummer's head. Place X-Y mics in the center and set up spaced stereo pairs so that they follow the 3:1 rule (the mics should be set up 3 to 6 feet apart if they are 1 to 2 feet above the cymbals). This counters any phase problems. Point the mic down toward the drums and you're ready to record. Figure 4 shows both of these set-ups.
Mic set up for the cymbals

Mic Set up for Cymbals / Crashes

Figure 4: Overhead mics capture the cymbals and the drums.

Tuesday 28 August 2012

Large stereo tri-amped PA system.


Professional PA set up, Large PA set up diagram,PA setup

       With the exception of the compressors, the additions incorporated into this system are simply a doubling of the system components covered in previous examples. At this point, you should have a pretty good grasp of how to hook it all together, so rather than listing a lengthy step by step, I have listed a brief description of each addition included in this example.
Two Monitor Mixes
       Running more than one monitor mix can be very useful in that you can provide different monitor mixes for different parts of the stage. I have found that the drummer often wants to hear different things in the mix than the rest of the band. With two different monitor mixes, this is easily accomplished. Simply assign one monitor mix (channel A) to the drummer and another (channel B) to everyone else. This way you can adjust what the drummer hears independently of what everyone else on stage hears. In order to do this, your soundboard needs to be equipped with more than one monitor channel. These channels, usually designated as "Monitor A" and "Monitor B", will be controlled by separate knobs and will have separate outputs which must in turn be hooked into separate equalizers, amplifiers, and speakers.
Multiple Effects Loops
       The same concept applies to the effects loops. To hook up two effects loops in a mixer that is equipped for it, all you have to do is run one loop through "Effects A" and another separate loop through "Effects B". Some boards come equipped with several different available effects loops that may be labeled "Effects 1", "Effects 2",etc. Sometimes the effects will be labeled as "auxiliary". You can run as many separate effects loops as your mixer is equipped to handle provided that you have enough separate effects units to pull it off. One possible use for this set up is that you could assign nothing but a long delay (echo) to Aux 2 and your general effects to Aux 1. Then when a song required a long echo on a certain part, all you would have to do is turn up the slider or knob for Aux 2 to get your desired echo without changing to rest of the effects at the same time. Then when the echo wasn't needed anymore, you could simply turn the Aux 2 all the way down effectively removing that effect from the mix.
Note:
       The effects send, monitor out, and auxiliary out channels are essentially nothing more than specifically labeled line out channels. This means that as long as you pay close attention to where you plugged things in and you properly re-label your knobs, you can use them interchangeably. Usually, the only reason to do this would be to acquire another monitor mix in a board that is equipped with only one monitor channel but has an extra unused auxiliary channel. To avoid confusion, I would recommend doing this only as a last resort. Also, don't forget that in order for your effects to work, they must return to the soundboard to complete the effects loop.

Mains in Stereo
       Running two separate channels for the mains is what is known as running a stereo PA system. To do this, you need a stereo mixing board. This board will consist of two output channels for the mains. These will be labeled either "left" and "right" or "A" and "B". The sliders for each input channel on the board will control both channels simultaneously, but there will be a "pan" knob above each that will allow you to pan the volume from left to right just like the "balance" knob on your car stereo. The output sliders on the board will operate the outputs for channel "A" and "B" independently of one another. Hooking this system up is essentially the same as what you did when hooking up two monitor mixes. Simply run the left channel "A" out to it's own equalizer, crossover, amplifiers, and speakers, and then do the same for the right channel "B". This is where those stereo (two channel) components come in handy. For instance, you can hook the "left out" from the board into the channel "A" input of the equalizer and hook the "right out" from the board into the channel "B" input of the same stereo equalizer. This principal can be followed all the way through the crossover, and the amplifiers.
Note:
When using a stereo amplifier in this way, make sure the switch in the back is switched to "stereo" mode.

Compressors
       Compressors are an effect that is usually run in-line in the main signal path. They make a subtle change in the sound of the entire system that amounts to "taking the edge off". There are a lot of technical descriptions for what they do, but my best description is to say that they do just what the name implies. They squash (or compress) the sound together to create a more compact and clean sound. Be careful with these, they can be used for either good or evil. Set to a moderate level, they can add to the quality of your overall sound, but set too high, they can take the life right out of your performance. Honestly, I am not the biggest fan of compressors, but I think I am in the minority, so I felt I should incorporate them into at least one example.

The Snake

       At some point you may want to use a soundman to run sound from somewhere other than the stage. In order to get the board out in front of the stage and across the dance floor, you will need a PA snake.
Snake cable connections, Snake for PA, PA cable connections

       The PA snake is used like an extension cord that connects all of the things on and behind the stage to all the things the sound man will be using in the sound booth on the other side of the room. The snake should have at least as many low impedance (low Z) channels as your soundboard, and at least 2 to 4 high impedance (high Z) channels depending on whether you are running a stereo setup or not. When setting your system up this way, the soundboard should be placed at least 30 feet or farther out in front of the main speakers so that the sound engineer will be far enough away to get a clear idea of what is coming out of the system. Also, the equalizers, the compressors, and the effects should be located along side the soundboard while the amplifiers and the crossovers should be located on or behind the stage. The on stage end of the snake will be a big box with individually numbered High Z inputs and Low Z outputs. The end of the snake toward the sound booth will have high Z outputs and Low Z inputs with numbers corresponding the inputs and outputs on the stage end. The ends toward the sound booth will be loose and look like the ends of microphone or instrument cords.
       To properly hook up the snake, simply plug each of the loose low Z ends into the channel on the soundboard that corresponds with the number printed on that end, then plug all of your microphones on stage into their regularly assigned channels at the box end of the snake. For instance, the loose end marked "1" should be plugged into input channel number 1 of the soundboard. Then, on the stage you can plug microphone number 1 into the number 1 input on the box end of the snake thus assigning microphone number 1 to channel number 1 of the soundboard.
       The high Z inputs and outputs are there to provide an extension between the compressors (if you're using them. If not, insert the word EQ for the word "compressor") at the sound booth and the crossovers on the stage. To do this, simply plug one of the high Z loose ends of the snake into the output of the compressor, and then plug a cable between the corresponding high Z channel on the box end of the snake and the input of the crossover located on the stage. This same principle applies to both the monitor channels and the main channels.
- Source ( thefxcode.com)

Monday 27 August 2012

Crossovers

Basically, crossovers are little electrical devices that receive a fullrange signal and divide it into separate outputs of midrange frequencies, lowrange frequencies, and highrange frequencies. That way, the highs are sent only to the speakers designed for the highs, the lows are sent only to the speakers designed for the lows, and the mids are sent only to the speakers designed for the mids. Passive crossovers do this by dividing the signal after it leaves the power amp while active crossovers do this by dividing the signal before it gets to the power amps.
       Passive crossovers (located inside full range speaker cabinets) are good in that they make it possible to provide a full range of sound using only one amplifier, but they are a little inefficient. Since all the speakers are working from the same source, the low speakers, which require more power, will tend to rob power from the higher frequency speakers and horns.
       Active crossovers (plugged in-line before the amplifiers) are good in that they make it possible to power the mids, lows, and highs from different amplifiers. This way you can use a big super-duper amplifier for your lows, and use a smaller amp for the mids and highs. This is a much more efficient use of power, and it gives you the ability to acquire a much more powerful and full sound. The catch is that using an active crossover requires a lot more equipment and expense.
       Using an active crossover in a system is sometimes called bi-amping or tri-amping. Below is an example of tri-amping the mains in a mono system.

Tri-Amping the Mains


Tri Amping System,PA using Crossover, how to use crossover


       The effects loop and the monitor system should be connected in the same way as before, but now the mains have been turned into a tri-amped system. To do this, a crossover, three separate amplifiers, and three separate sets of speaker cabinets must be used. Each of these amplifiers as well as each set of speaker cabinets must be designated to a specific audio frequency. Which frequency goes where is determined by the outputs on the crossover. The "low out" should go to the input of the amp with the highest wattage because the low end speakers will require the most power, and the "high out" should go to the amp with the lowest wattage because the horns will need the least power. Just remember that it takes a lot more energy to vibrate the great big cone on a fifteen or eighteen inch speaker than it does to move the tiny diaphragm in a midrange horn.
Warning:
Never plug a high end speaker or horn into the amp that is plugged into the "low out" of the crossover. These speakers are not designed to handle such low frequencies and will be damaged very quickly if hooked up incorrectly.

To hook up the system in example , follow steps 1 through 15:
Monitors and Effects
  1. Connect these together as described in example.
Mains (Keep in mind that even though the signal flow splits inside the crossover, it still flows from the mic toward the speakers)
  1. Plug a high impedance cord into the main "output" of the mixer.
  2. Plug the other end of this cord into the "input" of the main equalizer.
  3. Plug another high Z cord into the "output" of the equalizer.
  4. Plug the other end of this cord into the "input" of the crossover.
Lows
  1. Plug a high Z cord into the "low output"of the crossover.
  2. Plug the other end of this cord into the "input" of the highest powered amp.
  3. Plug a speaker cord from each "speaker out" of this amp into the "input" of each low speaker (one cord to each speaker).
Mids
  1. Plug a high Z cord into the "mid output"of the crossover.
  2. Plug the other end of this cord into the "input" of the middle powered amplifier.
  3. Plug a speaker cord from each "speaker out" of this amp into the "input" of each midrange speaker (one cord to each speaker).
Highs
  1. Plug a high Z cord into the "high output"of the crossover.
  2. Plug the other end of this cord into the "input" of the least powerful amplifier.
  3. Plug a speaker cord from each "speaker out" of this amp into the "input" of each Midrange/high horn (one cord to each horn).
  4. Take a break. That was a lot of work.
       To see how a large super-duper stereo PA system with multiple effects loops, monitors, and compressors is hooked up, simply click on "next page". Be patient though. The diagram is a little bit on the large side and will take a little time to load up.

Source (thefxcode.com) 

Small Practical PA

Small Practical PA


Basic PA Setup, PA basic setup, small pratical pa

       Here we have added monitors and effects. The monitors are the speakers that face back toward the stage so that the people there can hear themselves singing. They require a separate equalizer and amplifier and are hooked up in the same configuration as the mains (mic to mixer to EQ to amp to speaker), except that the cord running to the input on the monitor EQ is coming from the "Monitor out" channel on the soundboard rather than the "Main out". Basically what has happened is that the signal that has left the microphone has been split by the internal electronics of the soundboard into two separate signals. One signal is then routed through the "monitor out" into the monitors while the other is routed through the "main out" into the mains. This makes it possible to adjust the sound coming out of the monitor speakers separately from the sound coming out of the main speakers.
Note:
       If you are using a stereo equalizer, you can run the mains through one channel of the EQ (say channel "A") and the monitors through the other (channel "B"). Just remember which channel you assigned to the mains and which you assigned to the monitors.. That way you know which sliders and knobs adjust each part of the system. Doing this avoids the need to purchase a separate EQ, and allows you to fully utilize the equipment you already have.
This same principle can be applied to any stereo components in the system such as amplifiers, compressors, and crossovers, etc.....

       The effects help to thicken out or modify the sound that is going through the PA system. There are many different kinds of effects including such things as delay (echo), reverb, and chorus. These can be hooked up "in line" or directly in the path of the signal, but are much more versatile when hooked up in an "effects loop". An effects loop is created when a signal is sent out of the soundboard into and through whatever effects you are using and then "loops" back into the soundboard. Once this loop is set up properly, the effects can then be adjusted individually for each input channel (microphone, keyboard, etc...) on the soundboard. This means you could put a lot of echo on one guys vocals while adjusting another guys to have almost none. On the other hand, a digital delay (echo effect) in line with the mains....say, between the mixer and the EQ....would affect everything coming out of the main speakers equally, and everyone would have the same amount of echo.
Now that we have examined the concept, here's how you plug it all in:
Mains
  1. Connect everything together as described in example 2. This is essentially the signal path for the mains.
Monitors (Remember, signal path flows from the microphone toward the speaker.)
  1. Plug a high Z cable (patch cable) into the "Monitor out" of the mixer.
  2. Plug the other end of this cord into the "input" of the monitor equalizer.
  3. Plug one end of a high Z cord into the "output" of the monitor equalizer.
  4. Plug the other end of this cord into the "input" of the monitor power amp.
  5. Plug two speaker cords into two speaker "outputs" on the monitor power amp.
  6. Plug the other ends of these cords into the "inputs" of the monitor speakers.
Effects loop
  1. Plug a patch cord (usually high Z) into the "effects send" or "effects out" of the soundboard. This is where the signal leaves the mixer (you are sending it out of the mixer).
  2. Plug the other end of the cord into the "input" of the effects unit.
  3. Plug another High Z cord into the "output" of the effects unit.
  4. Plug the other end of this cord into the "effects return" or "effects in" on the soundboard. This is where the signal returns to the mixer thus completing the effects "loop".

Multiple effects

       You will probably want to run several different effects at the same time. This can be done by either using a multiple effects unit that will run many effects simultaneously within a single unit, or by putting several different effects units in line within the same effects loop. "In line" simply means hooking them up in a row such as in the following example.
[Effects Loop]

       In this case the signal flow is coming from effects send and flowing toward return. Remembering that the inputs are always on the upstream side of the flow, the "inputs" in this situation will always be coming from the effects send jack, and the "outputs" will always be going toward the effects return jack. Thus we have a signal path like this:
Effects send (from the board) to Input (on the delay) to Output (on the delay unit) to Input (on the Reverb unit) to Output (on the reverb unit) to Effects return (on the board)
       Some soundboards are equipped with more than one effects channel. All you need to remember is that if you used the effects send from channel "A", you have to use the effects return for channel "A". If your board has more than one effects channel, you can set them up totally independent of each other. This gives even more control when adjusting the sound to the individual mixer inputs (microphones, etc...).
- Source (thefxcode.com)

Noise Gates

A Guide to Noise Gates in PA Systems

A Noise Gate is to an expander much as a limiter is to a compressor. Essentially it is an expander that mutes the signal when it falls below the threshold, rather than simply reducing the gain. A downward expander with a ratio higher than 8:1 is effectively acting as a noise gate.

What it is

Usually a noise gate is a 19" 1U box with knobs or buttons (and more often than not a couple of LED meters) on the front. Some compressors have a noise gate function included in the channel facilities.

What it does

A noise gate mutes the signal when it falls below a threshold (the threshold is generally user-determined).

How it works

It senses the input level, and closes the channel when the input level falls below the threshold. It can have controls for:
• Threshold.The level below which the signal is muted.
• Attack. How quickly the gate opens once the signal reaches the threshold. On most sounds (particularly percussive sounds), the attack should be very fast to avoid cutting off the beginning of the sound.
• Release. Certain important parts of the sound (decaying resonance & natural reverb tails) may fall below the threshold. If the gate is closed too soon, the cut off may be audible (& unnatural).
• Filter. If a noise gate is used on a small rack-mounted tom, low-frequency sound from the kick drum may exceed any usable threshold. A filter enables the user to tune out (or sometimes tune in) a frequency range, so that the gate only opens when sounds in a particular frequency range exceed the threshold.
• Stereo/Mono. Most multi-channel noise gates allow coupling of each pair of channels for stereo use. If gating is applied to left and right channels independently, drop-out of one or other side can result whenever the signal on one side is above and on the other side below the threshold.

How do you use it?

If all else fails, read the manual!
Noise gates are usually connected on channel inserts.
Expanders and noise gates can have a disastrous effect if set up badly, and are at best problematic in live performances: spill from other instruments or from monitors can make it impossible to set effective thresholds. With care they can deal with very situation-specific problems (for example, buzzing from a bass guitar can be silenced between songs by careful use of a noise gate with a filter). However, they are most commonly used on drums, either to reduce spill between drums, or to reduce the ringing of undamped toms. In this application, they are usually used on channel inserts.
To use a noise gate on a drum:
1. Set the channel gain.
2. Set the attack and release to their fastest settings.
3. While the drummer hits that drum (and only that drum), raise the threshold until the drum starts to cut off.
4. Reduce the threshold a couple of decibels, so that the beat always exceeds it.
5. Increase the release time gradually, so that the drum is able to ring on a little after each beat.
Although the cut-off will still be audible, this will be much less noticeable when the whole kit is being used and the whole band is playing. A little reverb on the drum will help make the cut-off less noticeable during solos.
Other than on drums, leave well alone.

Do you need one?

If the drums are well tuned and damped (or if ringing toms are an intentional part of the drummer's sound), you probably don't need one. Otherwise, one channel for the kick drum and one for each tom can be useful. Most compressors include a basic noise gate on each channel, which is useful if you need to gate and compress the same signal (kick drum is sometimes a good candidate for this).

What sort do you need?

One that has at least all the controls described above. Four channels is usually enough (which might mean you need more than one unit).
-  Source (astralsound.com)

Dynamics Processors : Compressors / limiters

2.1. Introduction
    The aim of a compressor is to reduce the level of the loudest signals. Typical reasons for compressing are:
  • Controlling the energy of a signal. The human ear detects energy changes on signals. We can express the energy of a signal mathematically as its RMS value (roughly  its average value excluding the sign). The human ear is very sensitive to energy variations, so changes should always be smooth and subtle so as not to be evident to the ear. Alternatively, abrupt or excessive compression maybe used as an effect, though this is normally used for recording applications and not for live sound.
    Thus, we could keep a singer's voice under control, compensating for higher levels at the microphone due to shouting or getting too close to the mic, and therefore making the voice's levels more even.
  • Controlling the peak levels of a signal. Very often, our equipment is limited by its peak signal capacity. Amplifiers in different parts of a mixer's signal path may saturate. A power amplifier may clip. Loudspeakers maybe in danger of getting damaged by excessive excursion. In these cases, we are concerned about controlling the peak levels of signals, such that the needed processing tends to be some form of limiting rather than compression.
  • Reduce the dynamic range on a signal. If we attenuate the peaks out of signal, we are reducing its dynamic range. Since many devices are peak limited (power amplifiers, recorders), this allows us to increase the RMS level of the signal.
    Other than compressing RMS or peak levels, the detection circuit may also be RMS or peak based. Some compressors provide the ability to select between compressing based on the detection of average (RMS, the most common option) or instantaneous (peak) levels. The way to detect RMS levels may also vary: higher quality compressors detect real RMS, while cheaper ones only approximate it.
    Which brings us to defining what a limiter is. A limiter is really just a form of compressor. We could say that compressing is smooth attenuation, whereas limiting is doing it in an abrupt manner. Often we will come across compressors that feature dedicated limiters, thus offering simultaneous compression and limiting from a single unit. Typically, the term limiter is also associated to faster times, particularly for attack, so as to avoid exceeding a specific signal maximum at all times. Standard compressors will normally have a range of ratio values that allow performing both compression and limiting, which is the reason why they tend to be referred to as compressor/limiters.
2.2. Controls
Compression is a difficult task that may require very different characteristics depending of the type of signal. Numerous controls are therefore needed. The drawing below shows a compressor with the most common controls.
A typical compressor / Compressor Controls
The most common controls provided on compressors are given below. You may not always find all of them, or you may get additional ones:
  • Threshold. When this level is exceeded, the processor starts compressing (i.e., attenuating, reducing volume).
    The illustration below shows resulting levels (in dBs) of a signal being compressed with a higher and a lower threshold level. In the first example, the third signal peak passes through unaltered.
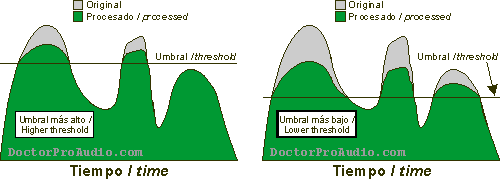
GrƔfica comparativa de umbral alto y bajo / Comparative graph for high and low thresholds
  • Attack time. It's the time it takes for the signal to get fully compressed after exceeding the threshold level. Minimum attack times may oscillate between 50 and 500 us (microseconds) depending on the type and brand of unit, while maximum times are in the range from 20 to 100 ms (milliseconds). Sometimes these times are not available as times, but rather as slopes in dB per second. Fast times may create distortion, since they modify the waveform of low frequencies, which are slower. For instance, one cycle at 100 Hz lasts 10 ms, so that a 1 ms attack time has the time to alter the waveform, thereby generating distortion.
    Specially for mastering and FM radio broadcast applications, where low dynamics are desired, there exist multiband compressors (also know as split-band compressors) that divide the spectrum into several frequency bands which are compressed separately with different compression times (faster for high frequencies, slower for low frequencies), and summed again into a single signal. This minimizes compression induced distortion while achieving very high compression, and avoids dulling of the sound, a compression side effect that will be explained later.
    In limiter applications where we want to avoid speaker damage, the longer the attack time, the higher the risk of damaging the equipment. However, too fast an attack time will generate distortion... we start to see the difficulties of selecting the correct times.
  • Release time. It's the opposite of attack time, that is, the time it takes for the signal to go from the processed (attenuated) state back to the original signal. Release times are much longer than attack times, and range from 40-60 ms to 2-5 seconds, depending on the unit. Sometimes, these times are not available as times, bur rather as slopes in dB per second. In general, the release time has to be the shortest possible time that does not produce a "pumping" effect, caused by cyclic activation and deactivation of compression. These cycles make the dominant signal (normally the bass drum and bass guitar) also modulate the noise floor, producing a "breathing" effect.
Although it is not commonplace on compressors (it is on gates), some models may provide a hold time control. This can be useful to avoid low frequency distortion when fast release times are needed, by setting the hold time to a time longer than a cycle of the lowest frequency. For instance, 50 ms for 20 Hz. That way the compressor waits for a cycle to be completed, thereby avoiding distortion of the shape of the waveform.
  • Compression ratio. This parameter specifies the amount of compression (attenuation) that is applied to the signal. It normally ranges between 1:1 (which is read "one to one", and represents unity gain, i.e., no attenuation at all) and 40:1 (forty to one). The ratios are expressed in decibels, so that a ratio of, for instance, 6:1, means that a signal exceeding the threshold by 6 dB will be attenuated down to 1 dB above the threshold, while a signal exceeding the threshold by 18 dB will be attenuated down to 3 dB above it. Likewise, a 3:1 (three to one) ratio means that a signal exceeding the threshold by 3 dB will be attenuated down to 1 dB. With a 20:1 ratio and above the compressor is considered to work as a limiter, though a theoretical limiter would have a compression ratio of infinity to one (whatever the input level, it would always be attenuated down to the threshold level, so that output would never exceed the threshold once the attack time has elapsed). We could say that a ratio of around de 3:1 is moderate compression, 5:1 medium compression and 8:1 strong compression, while over 20:1 (or 10:1, depending on who you ask) would be limiting.
    The illustration below shows original and compressed signal levels for ratios ranging from moderate to maximum compression (limiting). The ratios, from left to right, are 3:1, 1.5:1 and infinity:1 (note the slight overshoot as it takes a finite attack time to clamp the signal down to the threshold level).
GrĆ”fica comparativa de diferentes relaciones de compresiĆ³n / Comparative graph for different compression ratios
In a way, compression ratio and threshold are related, since both increasing the ratio and lowering the thershold will result in more compression being applied to the signal.
A more scientific way to show compression is through input versus output diagrams. We will find this type of graph in the user's manual of our unit. The 45 degree straight line represents the absence of dynamics processing, i.e., like a (loss less) cable. Above the threshold (which we have arbitrarily set to 0 dB), the 45 degree line deviates and forms another straight line with a slope that is lower the higher the compression ratio is. The line for the infinity:1 ratio shows a zero slope, since we are forcing the output signal to never exceed the threshold level, no matter what the input level is.
NOTE : If you find the graphs difficult to understand, look for an input level (horizontal axis) and follow it upwards in a straight line until you meet one of the compression lines. Take that point all the way to the left in a straight line to the output levels (vertical axis) and check that the level is lower. The example dotted gray line in the graph shows how a +10 dB input level becomes +5 dB a the output for a 2:1 compression ratio.
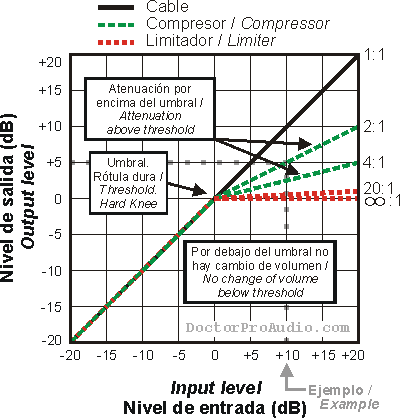
GrƔfico de salida/entrada de un compresor / Output/input graph for a compressor
 
  • Knee. On compressors that have it, it is a control that allows the selection of the transition between the processed and unprocessed states. Typically one would get an option between a "soft knee" and a "hard knee". Sometimes the control allows the selection of any intermediate position between the two types of knee . Sometimes soft knee compression is referrer to as "OverEasy" (can't start to even figure why, i do not see a connection to eggs over easy), as used by DBX branded compressors. The soft knee allows for a smoother and more gradual compression.
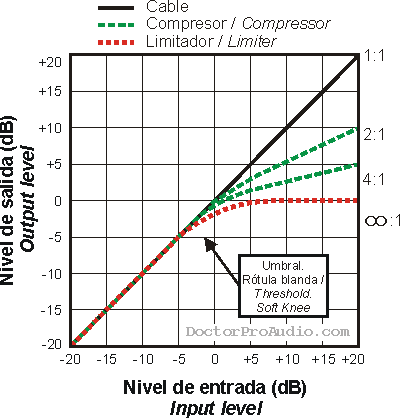
RĆ³tula blanda /soft knee
  • Stereo link. In general, when dynamics processors are used to process a stereo signal, we need to be able to link the processing on both channels such that it takes place on both channels at the same time. Otherwise the imaging will be confusing as it will change from the center to one of the sides or the other. Monophonic compressors often feature a link connection to be able to send a cable to another unit and synchronize the compression action.
     
  • Output gain. Since compression introduces attenuation, this can be compensated by raising the output volume and in fact this control is often referred to as "makeup gain", as it makes up for the compression-induced attenuation. Or, given that a compressor reduces the dynamics or a signal, we can raise the output gain to make use of all the available headroom of the equipment to which the compressor is connected, though that would also mean raising the background noise that was present in the signal. To avoid the latter, compressors are often utilized in combination with noise gates, which may also come built into the compressors themselves.
     
  • Automatic mode. It has become increasingly common to control some the compressor's parameters (typically attack and release times) automatically based on the signal's characteristics. This control enables that working mode. In general, automatic compression works well when one is looking for subtle compression, while the manual mode would be used for special effects.
     
  • Side Chain Listen. Compressor that feature a Side Chain function (explained later) often provide a switch that routes of the side chain signal to the output of the compressor, which permits listening to it, which helps troubleshooting and setting the compressor.
     
  • Bypass. Allows comparing compressed and uncompressed signals.
2.3. Meters
    Typically, compressors would feature at least some form of attenuation (compression) meter, which is normally implemented as a row of LED indicators. It informs the operator of how much attenuation in being applied so that he or she can evaluate whether the signal is correctly compressed or not (it could be over compressed or under compressed). The meter should show 0 dB (i.e., no compression) at some point when the signal is present, otherwise some of the compression is just continuous gain reduction that is best achieved with a volume control.
2.4. Side Chain
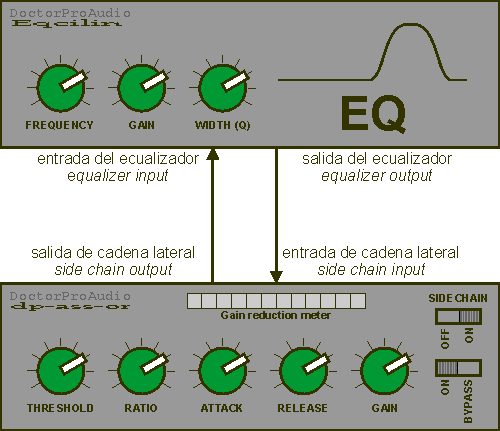
    Normally, the detection circuit uses a copy of the signal being compressed to check whether it exceeds the threshold level or not. However, many compressors allow using an external signal that is feed to the detector via the Side Chain (sometimes also called key) input. That way it is the external signal that triggers the compression, though it is the main signal that gets compressed. There may be a switch that toggles the detection signal between the main and the side chain signal, or sometimes, if the side chain input uses a 1/4" connector (often wrongly referred to as jack in many non-English speaking countries!), it is the connector that enables the function when the 1/4" plug is inserted. This 1/4" connector is an insert type connector that carries both a send and a return signal, the send carrying a copy of the main signal to facilitate its connection to a processor (e.g., an equalizer) and then feeding it back to the detector through the return part of the side chain connector.
    The most common use for this is using an equalizer for the side chain, So much so that some compressors already provide EQ facilities for the detector so that an external equalizer is not needed. For instance, we could reduce the high frequencies on the signal feeding the detector to avoid cymbals triggering the compressor. Or boost the sibilance frequencies to compress them on the main signal, a process which is referred to as "de-essing".
2.5. Setting a compressor depending on the application
    First of all, we need to decide whether we need compressing at all in the first place. Commercially available recordings are already compressed, so that it is seldom necessary to add further compression. In sound reinforcement applications, it is not common to use compression in a creative way to achieve specific effects, since it is the musicians that are responsible for their own sound character through effects units or amplifier combos. One must also bear in mind that compressing allows for increased average energy to reach amplifiers and loudspeakers, which could also increase the possibility of acoustic feedback, since a kind of sustain effect is generated.
    Before using a compressor, we need to connect it in the right place. If we use it in combination with a mixer, we will connect it to an insert point. The insert outputs are always pre-fader, which means we do not have to change the compressor's threshold every time the fader position is changed. Since attenuation of the higher volume signals produces a kind of sustain effect, compression may worsen some situations where feedback is a problem. On the other hand, if we apply compression to reduce the dynamic range and then add an amount of gain such that peak levels of compressed and uncompressed signals are the same, we are raising the average energy of the signal that gets to the amplifiers and speakers, which may be useful if we are short of equipment for the application, though it can potentially create thermal failure on the speakers (i.e., we may burn a voice coil) or trigger the thermal protection of the amplifiers (particularly if we are driving low impedance loads), which will mute to protect the amplifier. If we have an oversized system for the application, it's not a bad a idea to keep compression to a minimum on the instruments to a minimum and thus preserve their natural dynamics.
    Another side effect of compression is dulling of the sound, which is perceived as having less high frequency content. The reason for this is as follows. The frequency content of music has a lot more energy on the low frequencies than on the high frequencies. Which is why VUmeters move following bass drum and bass guitar. When a bass drum is compressed in the context of a full mix, we are also compressing the cymbal hits that may happen at the same time and which is a lot lower in level. The result of that is the aforementioned dulling of the sound. This effect can be minimized with slower attack times that let the percussive transients through. Some degree of high frequency boost is also often applied to counteract the dulling effect. Alternatively, some compressors automatically boost the high frequencies automatically during compression phases to avoid dulling.
        If we are looking to limit the output signal to a set level to protect a piece of equipment or avoid distortion, we will use a compressor (acting as a limiter in this case) just before the device (such as an amplifier or recorder). For instance, between the master mixer output and the amplifier. If the amplifier already features a built-in limiter that works as a function of the amplifier clip, it's probably best not to use a compressor and let the amplifier do it. If the speaker system is active and there is an active crossover with independent limiters per band, it would be advised to use these, as their attack and release times would normally be adequate for the frequency band being reproduced (quicker for high frequencies, slower for bass). I like clean sound system with some headroom to spare, so i would only occasionally active the limiter as a form of protection.
    In general, the criteria in this article are given as overall guidelines and starting points, but they will depend on the specific compressor model and they may have to be fiddled with by ear.
Limiters
For the compressor to work as a limiter, we will adjust the compression ratio to 20:1. Unlike compression, limiting is utilized as a brick wall that avoids signal peaks causing damage to speakers or overloading amplifiers (or recording devices), so limiters should only activate occasionally. Otherwise the effect will be very audible and sound quality will suffer. Attack times need to be fast to ovoid overload or over-excursion (on the speaker). Since there is always some degree of limiter overshoot (the limiter takes a finite time to provide full limiting, so some transient peaks may escape the limiting action), the threshold level may have to be set 2 or 3 dB lower than the level we do not want to exceed, so as to allow for some time for the limiter to be able to clamp the signal down.
Depending on the speed of a limiter's attack time, some limiters may distort the signal, working as abrupt wave form clippers. As mentioned earlier, some compressors are equipped with dedicated peak limiters. If so, we will make use of then as they are specifically designed for the job.
A specific type of limiter is the one that may be integrated into a power amplifier's channel to prevent continuous clip. If they are correctly designed, the compression (limiting) threshold is not fixed, and compression is only activated when the amplifier channel is actually clipping. The output voltage at which the amplifier clips may vary as a function of the type of signal and the mains power supply voltage, so the limiter would use a "floating" threshold to get the limiter to track the amplifier clip, avoiding unnecessary limiting when the amplifier is not clipping, or avoid the amplifier clipping when the mains voltage is lower than nominal AC power levels. In the case of the limiters in a crossover or controller, ideally they receive a "sense" signal from the amplifier to determine whether the amplifier for a given band is clipping or not, though the additional cabling makes it somewhat cumbersome for live sound applications. It the crossover unit is taking care of the limiting, in practice we have a multiband compressor and, if compression attack and release times are user selectable, we will need to chose faster timer for the high frequencies and slower ones for the low frequencies, thus optimizing the compromise between protection and audibility.
Ducking
Ducking refers to reducing (like a duck lowers its head) the level of a signal when another signal is being played. The standard example would be that of music being lowered when a DJ or presenter starts to talk. To achieve it we would use a copy of the presenter's voice fed into the detector circuit via the side chain (key) input.
Ringing out a system
A compressor can be used to aid setting up a system when it is being ringed out, i.e. its main feedback frequencies are being removed with an equalizer or a feedback elimination type unit. The compressor will have a low threshold level and infinity-to-1 ratio with hard knee characteristics. With no signal present, we will gradually increase the volume until the first feedback frequency rings. The compressor will catch it and keep it at a constant safe level, making adjusting the equalization an easier task. The process will typically be repeated until the third or fourth feedback frequency has been ringed out.
De-essing (compressing sibilance)
Certain singers exhibit excessive essing, which causes obvious sibilance. The side chain can be used to feed the detector with a signal that has the sibilance frequencies boosted such that the compressor is most sensitive to them. An equalizer is inserted in the side chain that would apply about 10 dBs to the 3.5-8 kHz region. That way, compression will take place 10 dBs before on sibilant sounds. The "s" sounds should trigger about 5 dB of compression, which will be set to be relatively fast. Normally the manufacturer provides a side chain output, which is just a copy of the input signal, but makes it easier to carry it to the equalizer or other gear. Sometimes the output and input for the side chain are in the same 1/4" stereo connector, like on a mixer insert. The illustration shows the configuration for de-essing.
CompresiĆ³n de sibilancia / de-essing
For live sound this is quite a cumbersome configuration, so it would probably only be worth doing it if de-essing was built into the compressor.
"Pop" compression
Basically the same thing as de-essing, but the "popping" frequencies (around 50 Hz) would be boosted on the equalizer to compress microphone handling pop sounds.
Voices
In live sound applications, the singers often place the microphone very close to their mouths. This generates very large volume changes from small changes in distance to the microphone. Sometimes, the singer may have a tendency to shout. For those reasons, some compression will help us to achieve more uniform levels. On the other hand, human hearing is very sensitive to manipulations on the voice, so compression should be as transparent as possible. Compression for the voice would normally use a soft knee setting and a compression ratio between 3:1 and 6:1, depending on the application. Attack time should be fast, and release time around 0.4 seconds. Level reduction should be about 5 to 7 dB on the loudest passages. For more rock type voices, we can use heavier compression with up to 10:1 ratio, a hard knee setting and attenuation levels up to 15 dB.
A benefit of compressing is a certain feeling of warmth as the artist's whispers can be heard. However, other low level vocal noises such as breathing and lip smack are also emphasized, so a noise gate (if the compressor has a built-in gate, this can be used) is sometimes needed to eliminate or attenuate them.
Acoustic guitar
(These settings are also valid for acoustic sounding electric guitars). Attack times should be in the 5-40 ms range, with around 0.5 s release. Slower times allow the percussive attack of the string to pass through. Ratios should be between 5:1 and 10:1, with around 5-10 dB level reduction.
Electric guitar
In general, the sound of the electric guitar does not need compression in sound reinforcement applications, since the much needed sustain is provided by the guitar amplifier and/or a compression pedal. If necessary, though, attack time should be in the 2-5 ms range (slower if some emphasis is to be preserved), and some 0.5 s release. Ratios should be around 6-10:1, with 8-15 dB compression and a hard knee setting.
For funk type sounds, compression should be higher, using a low thresholds and ratios around 6:1 with a soft knee settings.
Bass drum and snare
By and large, quite substantial compression is applied to the drums, particularly if the drummer's technique is not very consistent. Ratios should be around 4:1, with an attack time somewhere between 1 and 10 ms, closer to the latter if we want to emphasize the attack, which is particularly useful for adding presence and depth to the bass drum. Release times should be between 20 and 200ms; and in any case shorter than the time between drum hits. The threshold should be set such that the compression meter shows just a little compression in the softest parts and up to 15 dB on the loudest beats. Hard knee.
Pre-recorded drum sounds from a drum machine or samples from a drum module triggered by an acoustical or electronic drum set will require less compression that a real drum set picked up with microphones.
Bass
Like electric guitarists, (electric) bass players will normally provide an already compressed signal to the sound guy, given that compression is an integral part of their sound. In any case, bass is a the foundation of rock and pop music, so it is important that its level does not vary too much. Try attack times between 2 and 10 ms (slower times will emphasize the slap), with 0,5 s release. From 4 to 10:1 hard knee compression, meter showing 5-15 dB attenuation.
Brass
1 to 5 ms attack and around 250 ms release. Hard knee compression with 6 to 15:1 ratio and 7-15 dB level reduction.
Synthesizers
In general, these sounds do not have a large dynamic range, so they do not need much compression. For live sound, we can skip the compressor, though sometimes different sounds can have widely different signal levels. A 4:1 ratio may be enough to provide compression on the loudest sounds.
Instruments in general
We will use automatic times, or, if not available, fast attack times and around 0.5 s release. Around 5:1 ratio (soft knee) and about 10 dB compression.
Complete mixes
There are opposite lines of thought with respect to whether compression should me used on the main signals or not. Some compression could be used to generate a slight "pumping" effect and increase perceived signal levels, making it more exciting. Ideally one would use a multi-band compressor for this. If not available, we can use a fast attack time (around 5 ms) and the fastest release that does not create excessive "pumping". 
- Source (doctorproaudio.com)
Dynamics Processors. A tutorial

1.1. Introduction
    It not uncommon to have the need to control the volume (dynamics) of a signal in an automated way.
    We may be trying to avoid too high a level that will clip an amplifier or deafen the audience or send a speaker cone excursing to hyperspace. Or we may just want to regain control on the voice of a singer that will alternate shouting and whispering. Sometimes we will want to avoid background noise when no signal is present.
    To perform all those functions, dynamics processors come to our aid. These are commonly used in live sound reinforcement as well as multi-track recording, while they are not used as often for pre-recorded sound, which is assumed to have canned controlled dynamics. They are also not frequently used on fixed sound reinforcement installations (unless they do live sound), even though volume control on these is sometimes critical.
1.2. Defining dynamics processing
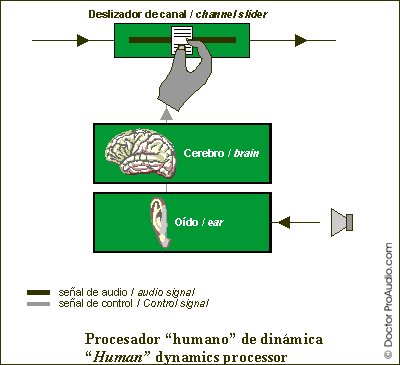
    The concept of a dynamics processor is really not that different from that of a person changing the volume by moving a mixer fader. For instance, if we have a singer that starts singing too loud or getting too close to the microphone, we will reduce the volume on that voice's channel. In that case we are proving compression. When the singer is not singing, we may move the fader all the way down to avoid background noise leaking into the main outputs, thereby acting as a noise gate. There is basically a process whereby someone is listening to the volume changes of a signal and taking the decision of whether the volume needs to be changed or not. The graph below illustrates the process : the auditory system detects the volume changes, and the brain commands the hand to bring the fader up or down as a function of the signal volume.
Human Dynamics Processor
    This human dynamics processor has its limitations. It can only control one channel, it is slow, and its actions are not repeatable. We might want to use a robot with an articulated arm that would ride a mixer's faders. In practice, though, we choose an electronic device that performs an equivalent function. The electronic version is not very different from a philosophic point of view, though it does away with its limitations.
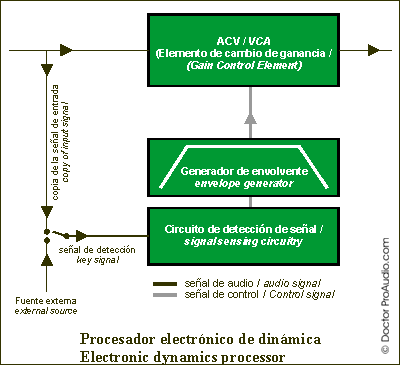
    As show below, the input to a dynamics processor is split into two. One of these signal copies will be processed by a gain changing element, which will typically be a voltage controlled amplifier (VCA) or a digital equivalent. The other copy goes to a detection circuit that rides the VCA. For the volume changes to be smooth, an envelope generator is used to ramp volume changes and thus avoid abrupt audible changes. The slope and shape of the ramp can be modified, as we will see later. Often we can choose to feed the detector with the input signal or, alternatively, an external signal which is referred to as the "Side Chain" or "Key" signal.
Electronic Dynamics Processor
    One of the side effects of using analog volume control elements (VCAs) to process the signal is noise. The quietest VCAs tend to be expensive, and therefore only included in highly professional equipment. As well as a good VCA, a quality dynamics processor also needs a good detection stage, which is by no means easy to design. Which would explain why only a handful of brands on both side of the Atlantic enjoy a reputation for quality dynamics processors and are used for serious sound reinforcement. A good dynamics processor should make it easy to control dynamics transparently, avoiding any kind of audible undesired "pumping" and "breathing" effects. Newer digital units, often built into digital mixers, do not suffer from noise problems, though quality dynamics processing algorithms are not easy to come by, and therefore it will probably be unrealistic to expect quality compression or gating from inexpensive digital products.
1.3. Types
The more commonly used dynamics processors are :
  • A compressor / limiter attenuates or limits signals exceeding a pre-defined signal level. There exists an special version of a compressor/limiter called "de-esser", which tames excessive levels of the portion of the frequency spectrum where sibilance occurs.
    A limiter is only a form of compressor.
  • A noise gate mutes or attenuates signals below a pre-defined signal level. If it allows the selection of the attenuation level (as opposed to just providing total attenuation, i.e. muting), it is referred to as a "downward expander". 
    There also exists the "true expander", though in practice there are no commercial devices that perform true expansion, which would entail amplifying signals above a specified level and attenuating those below it, therefore expanding the dynamics of a signal.
    We could also speak of digital (those that process a digitized signal) and analog devices. In reality, (good) digital devices can work like their analog counterparts, though normally one uses their processing power to increase manipulation possibilities. For instance, for recording and other non-real time applications, we could compress a signal using a "look-ahead" buffer to make compression/limiting decisions based on what is still to come, so that, for instance, we could start compressing a peak before it exceeds the threshold, avoiding the transient overshoot that would occur on an analog compressor and doing so in an inaudible way. 
1.4. Controls
Different dynamics processors will provide differing sets of controls and indicators. In general, the controls we will find on dedicated units (built-in ones may obviate some of the controls) are :
  • Threshold. When the signal goes above or below this level, the processing starts.
  • Attack time. It's the time it takes for the signal to get attenuated/limited/muted/amplified. In general, low attack times work better with low frequency signal and, conversely, faster attack times do a better job with high frequency signals. When processing a full range signal, attack times are generally based on the lowest frequencies present in the signal.
  • Release time. It's the opposite of attack time, i.e., the time it takes for the signal to go from a processed state to not being processed. Release times are normally longer than attack times.
  • Hold Time. Specifies the minimum time that a compressor or gate will process the signal for.
  • Ratio. Defines the amount of attenuation or gain that will be applied to the signal. On noise gates, it may be pre-set so that it is just a muting effect.
  • Stereo Link. Used to process a stereo signal such that both channels are always processed at the same time, even if one of them has not triggered the processing. This avoids confusing image shifts from the center to one of the sides when only one of the channels is being compressed or gated.
  • Automatic. It is becoming more and more common to control some of the parameters defined above (typically attack and release times) automatically based on the signal characteristics. This control activates or deactivates that feature.
  • Bypass. Allows comparing of the original versus the processed signal.
1.5. Meters and indicators
The most common visual indicators provided on dynamics processors are given below. You may not always find them, or you may get additional ones:
  • Gain or attenuation meter. It is normally implemented as a row of LEDs and indicates the amount of attenuation or gain being applied, to visually judge whether we are over processing or not processing at all. On noise gates we will normally only find an activation light.
  • Activation LED. Shows when processing is taking place.
  • -Source ( doctorproaudio.com)