Friday 5 October 2012

Frequency for Instruments

Magic Frequencies
Excerpted from The Mixing Engineer's Handbook


Editors' Note: The following excerpt from "The Mixing Engineer's Handbook" by engineer Bobby Owsinski discusses how EQ can affect different frequencies in an audio mix. A Tips and Tricks section at the the end features various professional engineers offering their perspective on EQ techniques.

Before we examine some methods of equalizing, it’s important to note the areas of the audio band and what effect they have on what we hear. The audio band can effectively be broken down into six distinct ranges, each one having enormous impact on the total sound.


Sub-Bass — The very low bass between 16Hz and 60Hz that encompasses sounds that are often felt more than heard, such as thunder in the distance. These frequencies give the music a sense of power even if they occur infrequently. Too much emphasis on this range makes the music sound muddy.

• Bass — The bass between 60Hz and 250Hz contains the fundamental notes of the rhythm section, so EQing this range can change the musical balance, making it fat or thin. Too much boost in this range can make the music sound boomy.

• Low Mids — The midrange between 250Hz and 2000Hz contains the low order harmonics of most musical instruments and can introduce a telephone-like quality to the music if boosted too much. Boosting the 500Hz to 1000Hz octave makes the instruments sound horn-like, while boosting the 1kHz to 2kHz octave makes them sound tinny. Excess output in this range can cause listening fatigue.
[an error occurred while processing this directive] 


• High Mids — The upper midrange between 2kHz and 4kHz can mask the important speech recognition sounds if boosted, introducing a lisping quality into a voice and making sounds formed with the lips such as “m,” “b” and “v” indistinguishable. Too much boost in this range — especially at 3kHz — can also cause listening fatigue. Dipping the 3kHz range on instrument backgrounds and slightly peaking 3kHz on vocals can make the vocals audible without having to decrease the instrumental level in mixes where the voice would otherwise seem buried.

• Presence — The presence range between 4kHz and 6kHz is responsible for the clarity and definition of voices and instruments. Boosting this range can make the music seem closer to the listener. Reducing the 5kHz content of a mix makes the sound more distant and transparent.

• Brilliance — The 6kHz to 16kHz range controls the brilliance and clarity of sounds. Too much emphasis in this range, however, can produce sibilance on the vocals.

Leo di Gar Kulka — “Equalization - The Highest, Most Sustained Expression of the Recordist’s Heart,” Recording Engineer/Producer, Vol. 3, Number 6, November/December, 1972
For those of you who have an easier time visualizing the audio spectrum in one-octave increments (like those found on a graphic equalizer), here’s an octave look at the same chart.
Easy-To-Remember Golden Rules Of EQ
1. If it sounds muddy, cut some at 250Hz.

2. If it sounds honky, cut some at 500Hz.

3. Cut if you’re trying to make things sound
better.

4. Boost if you’re trying to make things sound
different.

5. You can’t boost something that’s not there
in the first place.

31Hz
Rumble, "chest"
63 Hz
Bottom
125Hz
Boom, thump, warmth
250Hz
Fullness or mud
500Hz
Honk
1KHz
Whack
2KHz
Crunch
4KHz
Edge
8KHz
Sibilance, definition, "ouch!"
16 KHz
Air


Figure 5  -- Frequency for Instruments--
Tricks and Tips
General Tips

Use a narrow Q (bandwidth) when cutting; use wide Q’s when boosting
If you want something to stick out, roll off the bottom; if you want it to blend in, roll off the top

For Snare


To find the “point” on the snare, boost the upper midrange starting at about +5 or 6dB at 2kHz or so. Open up the bandwidth (if that parameter is available) until you get the snare to jump out, then tighten the bandwidth until you get only the part of the snare sound that you want most. Then fine-tune the frequency until you need the least amount of boost in order to make it jump out of the mix.


For Drums

Dave Pensado: A lot of the music I do has samples in it and that gives the producer the luxury of pretty much getting the sound he wanted from the start. In the old days you always pulled out a little 400 on the kick drum. You always added a little 3 and 6 to the toms. That just doesn’t happen as much any more because when I get the tape, even with live bands, the producer’s already triggered the sound he wanted off the live performance and the drums are closer.

For Bass

The ratio between the low bass (80–120Hz) and the mid-bass (130Hz–200Hz) is important. Try using two fairly narrow peaking bands, one at 100Hz and another at 140Hz and boost one and cut the other. If the bass is too warm, sometimes reducing the upper band can make it more distinct without removing the deeper fundamentals that live in the 100Hz band. Also, try boosting some of the 1kHz area since this is where a lot of the sound of the Fender bass lives.

For Fatter Guitars

Boost midrange a lot (9dB or so) and sweep the frequencies until you hear the range where the guitar sounds thick but yet still bright enough to cut through. Now, back the boost down to about +4 or so until the guitar cuts through the mix without being too bright.


Don Smith: I use EQ different from some people. I don’t just use it to brighten or fatten something up; I use it to make an instrument feel better. Like on a guitar, making sure that all the strings on a guitar can be heard. Instead of just brightening up the high strings and adding mud to the low strings, I may look for a certain chord to hear more of the A string. If the D string is missing in a chord, I like to EQ and boost it way up to +8 or +10 and then just dial through the different frequencies until I hear what they’re doing to the guitar. So I’m trying to make things more balanced in the way they lay with other instruments.

For Vocals

Boost a little at 125Hz to 250Hz to accentuate the voice fundamental and make it more “chesty”-sounding. The 2kHz to 4kHz range accentuates the consonants and makes the vocal seem closer to the listener.

Ed Seay: On a vocal sometimes I think, “Does this vocal need a diet plan? Does he need to lose some flab down there?” Or sometimes, “We need some weight on this guy so let’s add some 300 cycles and make him sound a little more important.”

David Sussman: If I’m recording vocals, I like to roll off quite a bit on the bottom end so the compressor doesn’t start kicking in and bringing up any low end rumble or noise. If I’m EQing a piano or something that’s already been recorded, I sometimes roll off a lot of the bottom so I leave a lot of room for the bass and the kick drum to occupy. A lot of times I don’t need anything under probably 100Hz. I’ll do some rolling off with the filters and then I may take a bell curve and zone in on a couple of other woofy areas on certain instruments.

Dave Pensado: I think of EQ as an effect much the same way you would add chorus or reverb to a particular instrument or vocal. Like, I might have a vocal where I think it’s really EQed nicely and then I’ll add a little more 3k just to get it to bite a little more. Then it just makes me feel like the singer was trying harder and it brings out a little bit of passion in his or her voice. So I tend to be most effective when I do the standard equalizing, then take it to the next level, thinking of it as an effect.

Source: ArtistPro

Wednesday 3 October 2012

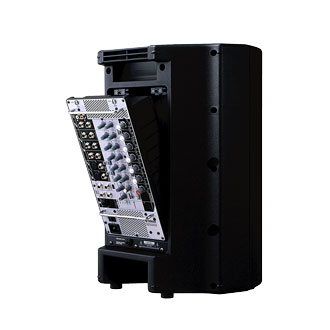
EON 210P - Portable PA Self-Powered 10” Two-Way system with detachable powered mixer

The EON210P consists of two 10-inch, two-way, powered loudspeakers, one with a detachable powered mixer and the other with a detachable storage compartment, one pair of unshielded speaker cables and a power cord. Capable of reproducing full bandwidth sound at high levels the 210P is comprised of a 250 mm (10 in) woofer, a 37.5 mm (1.5 in) neodymium high frequency compression driver coupled to a 100° H by 60° V waveguide driven by a 300 watt Crown® Class-D power amplifier and integrated mixer.

Features :


  • 300 watt High-Performance Powered Speaker System
  • Ergonomic soft touch top grip for easy handling
  • 10” low-frequency driver with neodymium magnet for low-distortion and light weight
  • 1” throat diameter next generation JBL neodymium compression driver
  • Efficient Crown® Class-D amplifier technology
  • 100° H x 60° V asymmetrical wave guide for uniform audience coverage
  • 8 channel powered mixer with intuitive interface
  • On board digital multi-effects
  • Integrated 36 mm pole mount socket with stabilizing securing screw
  • Highly designed composite enclosures for durability, lightweight, and acoustic performance

Specifications :


System Power Rating   :   300 Watts (2 X 150 Stereo)

Maximum SPL Output   :   124 dB peak system
output (pink noise)

Net Weight of System   :   33 lbs. (19 lbs. for unit
with powered mixer,
14 lbs. for unit with
storage pod)

System Type   :   Powered mixer with 2 two-way bass-reflex enclosures

Frequency Range (-10 dB)   :   60 Hz - 20 kHz

Frequency Response (±3 dB)   :   75 Hz - 19 kHz

AC input   :   120 - 240 V 50/60 Hz, voltage selector switch sets operational range

Amplifier Design   :   Crown® Class D

Output Connector   :   2 X 1/4” TS (unbalanced) amplifier outputs

Input Connectors   :   8 inputs (4 Mono Mic/Line, 2 X Stereo)

Channels   :   1-4 are XLR / 1/4” jack combo connectors, XLR is a mic level input, 1/4” is a line level input. 5-6, one pair of 1/4” balanced TRS jacks (stereo), and a pair of RCA jacks (stereo). 7-8 is a 3.5 mm stereo jack

Input Impedance   :   Ch 1-4 Combo: XLR 3 K Ohms Balanced
Ch 1-4 Combo: TRS 20 K Ohms Balanced
Ch 5-6: TRS 25 K Ohms Balanced
Ch 5-6: RCA 12 K Ohms Unbalanced
Ch 7-8: 3.5 mm 30 K Ohms Unbalanced

Phantom Power   :   30 V

Output Connectors   :   Monitor outputs: one pair of 1/4” balanced TRS jacks (stereo), and a pair of RCA jacks (stereo)
Headphone output: one 3.5 mm stereo jack

Signal Indicators
Main Output LED Ladder
  :   Limit: Red LED indicates limiter active condition
Signal: Green LED indicates signal present

Signal Indicators: Ch 1-4   :   Peak LED: Green = signal present, Red = input overload

EQ   :   Individual channel Bass and Treble controls, center detent, +/-6 dB cut and boost

System Limiter   :   On Board DSP Limiting and Tuning

LF Driver   :   1 x JBL 328 H 250 mm (10 in) woofer

HF Driver   :   1 x JBL 2414H-1 37.5 mm (1.5” ) annular polymer diaphragm, neodymium
compression driver

Coverage Pattern   :   100º x 60º nominal

Crossover Frequency   :   2 kHz

Crossover Type   :   Passive network, 2nd order filters (-12 dB per octave) for high pass and low pass filters

Enclosure   :   Polypropylene

Suspension/ Mounting   :   36 mm pole socket with stabilizing screw

Handles   :   One on top

Grille   :   Powder coated perforated steel

Shipping Package (HxWxD)   :   21.5” x 26” x 13.75”
(546 mm x 660 mm x 349 mm)

Applications :


  • Live sound reinforcement, speech and vocals, music playback in entertainment, A/V, and institutional venues – especially when ease of use and portability are important factors.
  • Amplification, mixing, and monitoring for electronic musical instruments.
  • Everywhere you need to be heard.
- Source (http://www.jblpro.com/)   

STAGEPAS 300 - Portable PA System

Live Sound Has Never Been Easier
This extraordinarily portable PA system has 8 channel (including 4 microphone) inputs and delivers a very respectable 300 watts of high-quality power to the supplied pair of compact speakers.

No matter where your music leads, Yamaha's new STAGEPAS™ 300 Portable PA system has the power and portability to go with you. It has all the power and high-quality sound you need to fill a small performance space, yet it is small and light enough to take wherever it is needed. Combining a built-in powered mixer and PA speakers, it's incredibly easy to use - you can be set up and playing in a matter of minutes! STAGEPAS™ 300 is the perfect road companion, providing powerful, reliable, convenient sound reinforcement for a wide variety of applications. Great sound has never been so portable - and so easy to use. High quality, convenience, and power to go!

Features

STAGEPAS300: On Stage Anywhere, Anytime

STAGEPAS300 is a portable PA system that can be set up to provide high quality live sound anywhere, anytime. Designed primarily for musicians on the move, STAGEPAS™ 300 makes it possible to deliver high-quality live sound in just about any venue or environment with maximum handling ease and minimum hassle.

Speakers, Powered Mixer, and Cables

This all-in-one system provides a pair of passive speakers, a detachable powered mixer, and a pair of speaker cables - everything you need except for your sources. The whole system weighs just 18 kilograms!

Detachable 8-channel Powered mixer with 150W + 150W Output

The powered mixer is normally stored in the rear of one of the speakers. The STAGEPAS™ powered mixer can be detached (the only tool you need is a coin) for convenient operation. The power amplifier is a class-D* type that delivers a solid 150 watts + 150 watts from a remarkably compact unit. The mixer has a total of eight input channels: four mono microphone/line inputs and two stereo line inputs. In addition to speaker outputs for the supplied speakers, the STAGEPAS™ mixer has line outputs that can be used to connect additional powered speakers for monitoring, or to send the mixer's output to a recording device. * Class-D power amplifiers provide high-efficiency amplification with low power consumption and minimal heat generation, allowing the amplifier to be built into a smaller, lighter, and cooler package.

Two-band EQ and Reverb Built In

Each mixer channel has an easy-to-use two-band equalizer that can help to shape the sound of each channel to achieve the best possible mix. Boost the highs to give a vocal channel more air and clarity, or boost the lows on a guitar channel for more punch. The four mono input channels have reverb on/off switches, and a reverb level control lets you add just the right amount of reverb to bring your sound to life.

For Singers & Instrumentalists

The built-in high-quality reverb is indispensable for great vocal sound, and it can add a lush dimension to the sound of electric-acoustic guitars as well.

For Speech

The STAGEPAS™ mixer has a "speech" mode that optimizes the system settings for maximum clarity with speech. Of course, background music from a CD player or other source can be mixed in with the spoken performance.

For Bands

Multiple microphone inputs make the STAGEPAS™ 300 system a good choice for band rehearsals or performances. MSR100 powered monitors (sold separately) can be added for monitoring.

Optional Mic Stand Adaptor

The optional BMS-10A Mic Stand Adaptor allows the STAGEPAS™ mixer unit to be mounted on a standard straight microphone stand. Mic stand mounting is an ideal way to position the mixer for easy control access while performing.

- Source (http://in.yamaha.com)

STAGEPAS 250M - Portable PA system

STAGEPAS 250M - Portable PA System

STAGEPAS 150M and 250M can function either as an ultra-portable PA system, or as a powerful keyboard amplifier with sound quality and portability that far surpasses any other conventional keyboard amp.


Combining high-performance power and accurate sound reproduction with remarkable versatility in a portable package, Yamaha's STAGEPAS Series Portable PA Systems are fast becoming the standard for musicians and other PA users on the go.These combination mixer/amplifier/speaker systems are exceptionally lightweight, portable and full-featured. Since virtually everything you need is in one, easy-to-use package, you can be set up and playing within a matter of minutes. And when you're done, you can be packed and back on the road again with the same ease and speed. Yet despite the simplicity and compact size, these systems cut no corners in sound quality or versatility, and in fact give you some advanced features not normally found in systems of this class.The series now includes the new single-speaker STAGEPAS 150M and 250M, which can be expanded to a stereo system by simply adding a second speaker. They can also function either as an ultra-portable PA system, or as a powerful keyboard amplifier-with sound quality and portability that far surpasses any other conventional keyboard amp. No matter what system you choose, you have a high-power, highperformance sound system ready for a wide variety of venues and events, both indoors and out.

Ideal for Monitor Speaker Use

The STAGEPAS 250M and 150M are effective as a monitor speaker system (especially for keyboard players, drummers and solo performers), thanks to its fullrange reproduction, convenient mixing controls, and versatile speaker placement.

* For Keyboard Players

Keyboard players needing a simple, yet exceptionally high-quality keyboard amplifier will find ideal solutions in the STAGEPAS 150M and 250M. These compact, highly portable and easy-to-use systems can serve as your main system for small gigs, or as a sub-mixer for direct connection to the main mixer at large events.

* For Guitarists

The STAGEPAS 150M and 250M are excellent systems for guitarists playing in small venues, since they deliver outstanding sound for the house as well as great monitor sound for the player.


-Source (http://in.yamaha.com)

Walkabout - Portable PA System - Studiomaster

Walkabout - Portable PA System - Studiomaster

Walkabout - Portable PA System - Studiomaster

Walkabout - Portable PA System - Studiomaster

Walkabout - Portable PA System - Studiomaster


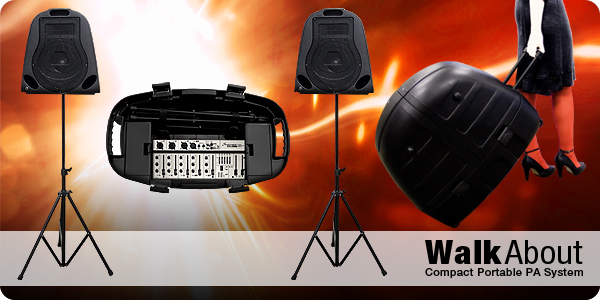
The need for compact, portable PA systems has never been greater. Light weight, powerful, easy to set up but above all easy to use systems are compulsory. The Walkabout has perfectly addressed these requirements in a functional yet stylish package.
The Walkabout features a total of 300 Watts of clear audio power, 5 channel mixer (3x mic/line, 1x mic/stereo and 1x stereo), 16 program DSP and 5 band graphic equaliser. Sockets are also provided you record your performance.

It contained in its own carry case and include speaker stands, microphone and all cables. Once packed the Walkabout has a retractable handle and recessed casters making light work when moving.


Equalisation
HI (12kHz), LO (80Hz)
Graphic Equaliser
125Hz, 400Hz, 1kHz, 4kHz, 8kHz
Power
2 x 150W
Speakers
2 way
Connections
Channels 1-3:
Channel 4/5:
Channel 6/7:

Combination XLR mic & TRS jack line
XLR mic and stereo line (2) TS jacks
Stereo line RCA phono
Record Output
RCA phono
Speaker Outputs
TS jacks
Speaker Input
Single TS jack
Power Requirements
Voltage Selector
230V Range 50/60Hz
115V Range 50/60Hz


Source : (http://www.studiomaster.com)

Wednesday 12 September 2012

Balanced Wiring & its Advantages

Professional equipment solves this problem by using two closely-spaced conductors twisted together. Audio is balanced equally on these wires, flowing in a positive direction on one wire while in a negative direction on the other. Equipment looks at the voltage difference between those wires, and ignores everything else. A grounded shield is still used to prevent high-frequency noise, and it might form a hum-gathering antenna -- particularly if there are other ground connections. But since the ground isn't part of the audio path, nobody cares.

Balanced Wiring,Advantages of balanced wiring,wiring A balanced shielded cable.

Most modern circults do not use balanced wiring internally. The internal wires or printed-circuit traces are so short that noise pickup isn't a problem. But they balance the signal before it leaves, and unbalance any incoming ones. This is very easy to do with op amps or transformers. Balanced wires also reject noise that isn't coming from a ground loop. The two conductors are twisted closely together, so any interference radiated into the cable is picked up equally by both. But remember: the equipment is looking for a voltage difference between those wires. Noise is the same on both wires, so the equipment can't hear it.

Another advantage of balanced wiring

If a single-conductor shielded cable acts as an antenna, why doesn't two-conductor balanced wiring act as a double antenna? Answer: it does. Noises from nearby video or computer cables are picked up on each conductor. But remember, a balanced audio input cares only about the voltage difference between the two wires. Interference is radiated equally into each wire. Since the interference is equal on each, there's no voltage difference from it! The balanced input can't even see that the noise is there.
Or to put it into a chart:
Conductor           Audio Signal    Noise     Total on wire
    Black               +1 v          +1 v     +2 v
    White               -1 v          +1 v      0 v

Transmitted difference   2 v
                           Received difference  2 v
This noise-immunity of balanced wiring is why it's also used for high-speed computer networks. Category-5 cable contains four tightly-balanced pairs of wires. In fact, if your balanced input and output circuits are good enough, you can use Cat-5 cable for professional audio wiring! "Star Quad" is four-conductor shielded balanced cable. The four wires form a tighter, more consistent pack than two wires can and can resist even more noise. If you're using Star Quad, you must tie the two pairs of similarly-colored wires together at each end... reducing it effectively to two conductors. Don't try to use it as two balanced pairs for two different signals: this won't give you any noise-reduction benefits at all. 

- ( Source : http://www.dplay.com)

About ground loops

People hum when they don't know the words. Audio circuits hum when they don't know what silence should sound like. The sensitive circuits that boost your camera's audio before it's recorded, or shuttle sound around your editing suite, need a reference they can be sure is zero volts. They compare the input signal to this reference, amplify or proces the difference, and generate an output voltage that's also compared to the reference. Designers designate one point within a piece of equipment (often connected to the chassis or grounding pin of the power plug) and call it "ground": all voltages inside the equipment are measured with respect to it.
That's fine for a single piece of equipment, but when you hook two devices together, both have to agree on the reference. Since the cable shield has to be grounded at least at one end, the usual scheme is to use it to connect the two devices' reference points together. It works in very simple systems.
But remember, that shield is picking up hum from the building wiring. And if the shield is carrying current -- something unavoidable if it's part of the audio path -- it has a slight voltage drop. Both these factors mean that the two devices are going to have slightly different references, and the difference is constantly varying. The input circuit can't tell that this variation isn't part of the signal, so it amplifies it. Again, in a simple NLE with short wires this interference may be tolerable. But in a complex room or studio shoot, it becomes hum and noise.

It's called "60 Hz hum", but it's not just 60 Hz

When power-line frequencies leak into an audio circuit, they generate harmonics. The 60 Hz base signal also hums at 120 Hz, 240 Hz, and up the band. That's why filters don't do a good job removing hum... you have to fix it at the source

Complex setups have other problems as well. If there are multiple ground paths, they combine to make a very efficient loop antenna for the 60 Hz noise. These "ground loops" are almost impossible to predict, since you don't know the internal details of your equipment, and can crop up even in very simple setups... particularly if both pieces of audio equipment also share a ground connection through their power plugs' grounding pins. In a practical video studio, the situation is apt to be far worse: the non-audio cables -- RS-232 and RS-422 control, video wires, and even cable TV -- all have their own grounds. 
- (Source : http://www.dplay.com)

Why wires are noisy?

Why wires are noisy

If your tracks are plagued by noise and low-frequency hum, it's probably because of a wiring problem. But the solution is simple, relatively inexpensive, and has been around for a hundred years. Balanced audio wiring was first used by the phone company, to send calls over hundreds of miles of low-quality wire without picking up too much noise. Today it's used by every audio professional for much the same reason. The problem is that wires are also antennas. When you plug a mic into a camera, or a DAT player into your NLE, you don't just get the desired signal. Any nearby electric fields are also picked up on the wire, adding a slight voltage which the equipment can't distinguish from the desired audio.
You can't avoid these fields. They're created by any other wires that carry a current. This includes video, timecode, and data cables, which can add all sorts of high-frequency whines and whistles to your track.
Manufacturers reduce this antenna effect in a signal wire by wrapping a shield around it, usually a copper braid or metal foil. The shield is connected to ground and shorts out the interference before it can reach the signal wire in the center of the cable. That's why phono, BNC, and cable TV plugs have a center pin and outer metal shell: the pin is signal, and the shell carries the shielding that in the wire.

Shielded cable A typical shielded cable.

Bah, Hum.

Of course the biggest currents in most places are in the wires that supply electricity to lights and and wall outlets. They radiate a lot. Cable shields aren't very effective with this 60 Hertz interference from the power-line frequency. Fortunately, it takes a much longer antenna to pick it up than the higher-frequency interference from video or timecode cables. In a small editing setup with short wires, the amount of 60 Hz pickup is very little compared to the audio voltages, so interference is minimal. But on shoot with long microphone cables, or in a complex post-production setup (my studio has about 3500' of analog wiring), the hum can be a major problem. Furthermore, the same shielding that protects against high-frequency noise can contribute to hum.

-Source (www.dplay.com)

Tuesday 11 September 2012

3 Pin XLR Wiring Diagram

Okay, this may be really basic, but for some of you it may just be what you were looking for. Here is the basic wiring diagram for a standard 3 pin XLR connector, used in audio for mics, playback machines, intercom, etc.
wiring of 3pin xlr diagram
Cable designed for being cut into standard mic cables may have 2 pairs of wire and a shield around the outside, in that case pair the colors together and make sure they go to the same pin number on each end.  The surrounding shield should be soldered to pin 1.  Balanced audio cable designed for installs usually has a black, white, and ground wire.  The uninsulated ground wire should go to pin 1, the red wire to pin 2, and the black wire to pin 3.

-Source (http://www.toffer.com)

Friday 31 August 2012

Mixer Connections & Operation

A detailed overview for beginners covering commonly asked questions on mixer operation.

Many people are confused by mixers because they are complex devices.

In this article I’ll attempt to answer some beginners’ questions on mixer operation:
• How do I hook up a mixer to the rest of the system? What jacks are best to use?
• How do I use graphic equalizers?
• What are compressors used for?
• How do I use groups?
• How do I set up monitor mixes?
• How do I set up the mixer to add effects?
• What’s a good resource for understanding mixers?
What jacks should I use to connect the mixer to my sound system?
Mixer Connections & Operation
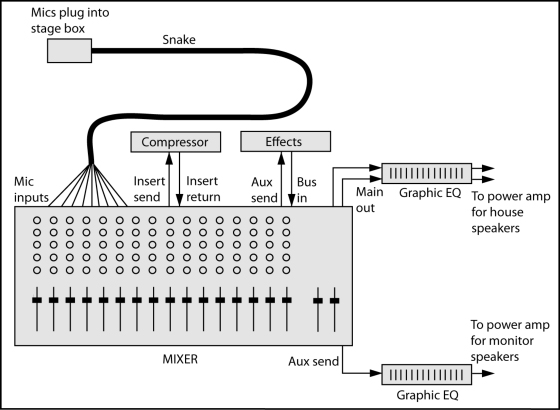
Figure 1. Mixer connections.

• Connect each mic to the stage box (snake).

• Connect each snake XLR connector to each mic input XLR connector.
• Connect the mixer master or main output to your graphic equalizer input, and connect the graphic output to your house power-amp input. If you are not using a graphic equalizer for the house speakers, connect the mixer master outputs to the inputs of the power amp that drives the house speakers.
• If you are recording a board mix of the service or show, connect the mixer REC OUT or TAPE OUT connectors to the recorder line inputs.
Later in this article we’ll cover connections for compressors, the monitor system and effects devices.
Why would I put a graphic equalizer between the mixer and power amps? Isn’t that what the mixer EQ is for?
Mixer EQ affects the sound of each individual instrument and voice, while the graphic EQ affects the sound of the complete mix.
The graphic equalizer is used the flatten the frequency response of the house speakers and room so that the entire sound system is accurate or hi-fi.
One way to set a graphic EQ is to play some reference CDs alternately through high-quality headphones and through the house loudspeakers.
Adjust the graphic-EQ sliders to make the loudspeakers sound like the headphones in their bass-midrange-treble balance.
Here’s another way to set a graphic equalizer.
1. Obtain a measurement microphone, which is an omnidirectional condenser mic with a flat frequency reponse. Put the mic in the center of the audience area.
2. Plug the mic into a real-time analyzer (RTA) set to display 1/3 octave bands.
3. Play pink noise through one set of house loudspeakers (one combination of woofer, midrange and tweeter drivers).
4. On the graphic equalizer, pull down the frequencies that are the highest on the RTA display.
5. Try to get a flat spectrum (equal level in each frequency band) up to 1 kHz, then let the spectrum roll off gradually to about 10 dB down at 10 kHz. This is called a “house curve”.

It’s also common to use a graphic EQ between the mixer’s monitor send (aux out) jack and the power amp that drives the monitor speakers (see Fig. 1).

That EQ is used to reduce the levels of frequencies that feed back. You also can use the graphic EQ to reduce the bassy sound in the monitors caused by microphone proximity effect (the bass boost that occurs when directional mics are used up close).
The monitor signal from the board is pre-EQ, so turning down the bass (low frequencies) on the mic channel does not turn down the bass in the monitor speakers.
That’s where a graphic EQ can help: turn down frequencies a few dB below 200 Hz or so. Then the monitor speakers won’t sound too bassy and muddy.
What’s a compressor for? How do I connect it to a mixer?
A compressor is used to reduce the dynamic range of whatever signal you pass through it. For example, a lead vocalist might suddenly sing a very loud note, blasting the listeners.
The compressor is an automatic volume control - it turns down loud notes so they don’t get too loud. If this isn’t a problem in your venue, you don’t need a compressor.
You insert a compressor in-line with one of the mic channels (see Fig. 1). Find the mic channel on the back of the mixer, and connect its insert send to the compressor input. Connect the compressor output to the insert return on the same mixer channel.
If there is only one insert jack per channel, the tip of the jack is send and the ring of the jack is return, so use a stereo phone plug at the mixer going into two plugs (in and out) at the compressor.
Would I use grouping to combine several channels into one—say, for a monitor for just the vocalists?
The groups are for the house speakers, not the monitor speakers. You might assign all the vocal mics to Group 1 (also called Subgroup 1 or Submix 1). ‘
Then you can control the overall level of the vocals with just the Group 1 fader. Start with the group fader and master fader about 3/4 up (at unity gain, or 0 dB).
You don’t have to use groups, but some people find it convenient.
If you don’t use groups, just assign each mic channel to the stereo mix bus (the master stereo output of the console), and turn down all the group faders because they are not being used.
To confuse things, some consoles use Group 1 and Group 2 as the main stereo output channels. Other consoles have groups plus a separate stereo master output channel.
How do I set up monitor mixes?
The aux knobs in your mixer can be used either for monitor mixes or for controlling the amount of effects on each input channel. First decide which aux channel you want to use for a monitor mix.
You might use several aux channels (aux 1, aux 2, aux 3) to create separate monitor mixes for different performers. Each aux number is a separate monitor mix, feeding a separate monitor power-amp channel, feeding a separate monitor speaker.
Let’s start with just one monitor mix.
Suppose that you’ll create a monitor mix with all the aux 1 knobs. On the back of your mixer, connect the aux 1 send connector to the graphic equalizer (if any) used for the monitor speakers, and connect the graphic equalizer output to your monitor power-amp input (see Fig. 1).
If you are not using a graphic EQ with your monitor speakers, connect the aux 1 send to the monitor power-amp input.
Set all the monitor aux knobs to pre-fader so that the fader for each channel does not affect the monitor level.
What if you need several different monitor mixes? You might use all the aux 1 knobs to set up a monitor mix for the vocalists. Connect aux 1 out to the power-amp channel for the vocalists’ monitor speakers.
Then use all the aux 2 knobs to set up a monitor mix for the drummer. Connect aux 2 out to the power-amp channel for the drummer’s monitor speaker. Use aux 3 for the piano player, and so on.
For example, let’s say the vocalists need to hear only the piano and vocals in their monitor speakers. You would use all the aux 1 knobs across the console to set up a monitor mix for the vocalists. Turn up the piano channel’s aux 1 knob about halfway.
Turn up the vocal channels’ aux 1 knobs about halfway. Turn up the aux 1 master knob (if any) about halfway. Make sure the vocalists can hear the monitor mix, and adjust it according to what they want. Turn up the aux knobs slowly and stay below the feedback point.
Similarly, suppose the drummer needs to hear only the piano and bass. You might use all the aux 2 knobs across the console to set up a monitor mix for the drummer. Turn up the piano channel’s aux 2 knob about halfway.
Turn up the bass channel’s aux 2 knob about halfway. Turn up the aux 2 master knob (if any) about halfway. Make sure the drummer can hear the monitor mix, and adjust it according to what the drummer wants.
How do I set up the mixer to add effects?
As we said earlier, the aux knobs in your mixer can be used either for monitor mixes or for controlling the amount of effects on each input channel. First decide which aux channel you want to use for effects.
Suppose aux 4 is your effects channel On the back of your mixer, connect the aux 4 send connector to the input of your effects device. Connect the output of the effects device to the Bus In or Effects Return connector on your mixer (see Fig. 1).
Another option is to connect the effects outputs to the line inputs of two extra input channel strips on your mixer, and have those be the effects-return level controls.
Set the effects-send (aux 4) knobs to post-fader so that the fader level also controls the amount of effects. Set the dry/wet mix control on the effects unit all the way to wet (100% effect).
For each input channel (vocal or instrument), use the aux 4 knob to set the amount of effects you want to hear on that vocal or instrument.
Note that some mixers have effects built in so you don’t need to make any effects connections.
- Source ( prosoundweb.com)

Setting Mic For Drums

Miking the Drumset in Your Home Recording Studio

If you're like most musicians, getting great-sounding drum recordings seems like one of the world's great mysteries. You can hear big, fat drums on great albums, but when you try to record your drums, they always end up sounding more like cardboard boxes than drums. Fret not — here are some solutions for you.

The room

The room influences the drums' sound more than it influences other instruments'. If you're looking for a big drum sound, you need a fairly live room (one with lots of reflection).
You may be thinking, "But I just have a bedroom for a studio and it's carpeted." No worries, you can work with that. Remember, you have a home studio, so you potentially have your whole home to work with. Here are a couple of ideas to spark your imagination:
  • Buy three or four 4-x-8-foot sheets of plywood and lean them up against the walls of your room. Also place one on the floor just in front of the kick drum. This adds some reflective surfaces to the room.
  • Put the drums in your garage (or living room, or any other room with a reverberating sound) and run long mic cords to your mixer. If you have a studio-in-a-box system, you can just throw it under your arm and move everything into your garage or, better yet, take all this stuff to a really great-sounding room and record.
  • Set up your drums in a nice-sounding room and place an additional mic just outside the door to catch an additional ambient sound. You can then mix this in with the other drum tracks to add a different quality of reverberation to the drums.

Kick (bass) drum

The mic of choice for most recording engineers when recording a kick drum is a dynamic mic. In fact, you can find some large diaphragm dynamic mics specifically designed to record kick drums.
No matter where you place the mic, you can reduce the amount of boominess that you get from the drum by placing a pillow or blanket inside the drum. Some people choose to let the pillow or blanket touch the inside head.
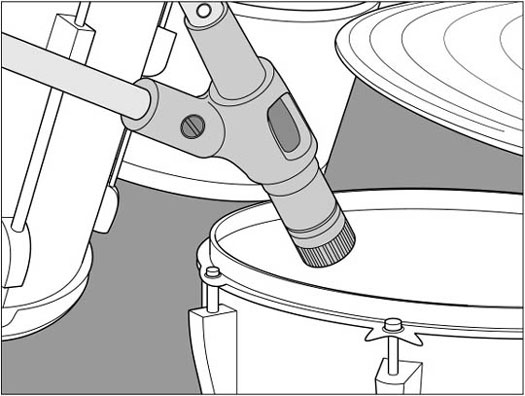
That said, you can place your mic in several ways (all conveniently illustrated in Figure 1):
  • Near the inside head: If you take off the outside head or cut a hole in it, you can stick the mic inside the drum. Place the mic 2 to 3 inches away from the inside head and a couple of inches off center. This is the standard way to mic a kick drum if you have the outside head off or if a hole is cut in it. This placement gives you a sharp attack from the beater hitting the head.
  • Halfway inside the drum: You can modify the preceding miking technique by moving the mic back so that it's about halfway inside the drum. In this case, place the mic right in the middle, pointing where the beater strikes the drum. This placement gives you less of the attack of the beater striking the head and more of the body of the drum's sound.
  • Near the outside head: If you have both heads on the drum, you can place the mic a few inches from the outside head. If you want a more open, boomy sound (and you have the drum's pitch set fairly high), point the mic directly at the center of the head. If you want less boom, offset the mic a little and point it about two-thirds of the way toward the center.
Mic setup for the kick drum

Figure 1: There are several places that you can place a mic to get a good kick drum sound.
The kick drum responds quite well to a compressor when tracking. For the most part, you can get by with settings that allow the initial attack to get through and that tame the boom a little. A sample setting looks like this:
Threshold: -6dB
Ratio: Between 4:1 and 6:1
Attack: Between 40 ms and 50 ms
Release: Between 200 ms and 300 ms
Gain: Adjust so that the output level matches the input level. You don't need much added gain.

Snare drum

The snare drum is probably the most important drum in popular music. The bass guitar can cover the kick drum's rhythm, and the rest of the drums aren't part of the main groove. A good, punchy snare drum can make a track, whereas a weak, thin one can eliminate the drive that most popular music needs.
Because the snare drum is located so close to the other drums, especially the hi-hats, a cardioid pattern mic is a must. The most common mic for a snare drum is the trusty Shure SM57. The mic is generally placed between the hi-hats and the small tom-tom about 1 or 2 inches from the snare drum head (see Figure 2). Point the diaphragm directly at the head. You may need to make some minor adjustments to eliminate any bleed from the hi-hats. This position gives you a nice punchy sound.
Mic setup for Snare drum

Figure 2: The proper placement for the snare drum mic.
Adding compression to the snare drum is crucial if you want a tight, punchy sound. There are a lot of ways to go with the snare. The following settings are common and versatile:
Threshold: -4dB
Ratio: Between 4:1 and 6:1
Attack: Between 5 ms and 10 ms
Release: Between 125 ms and 175 ms
Gain: Adjust so that the output level matches the input level. You don't need much added gain.

Tom-toms

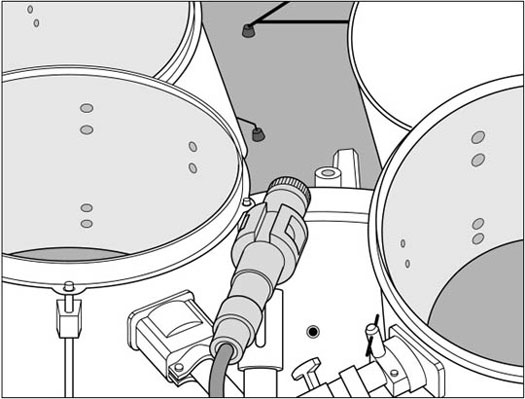
The tom-toms sound best when using a dynamic mic. For the mounted toms (the ones above the kick drum), you can use one or two mics. If you use one mic, place it between the two drums about 4 to 6 inches away from the heads (Figure 3 shows this placement option). If you use two mics, place one above each drum about 1 to 3 inches above the head.
Mic setup for drums tom tom

Figure 3: Miking the mounted tom-toms with one mic.
Floor toms are miked the same way as the mounted tom-toms:
  • Place a single mic a couple of inches away from the head near the rim.
  • If you have more than one floor tom, you can place one mic between them or mic them individually.
If you want to apply compression to the tom-toms, you can start with the settings that for the snare drum in the preceding section.

Hi-hats

The hi-hats are generally part of the main groove and, as such, you want to spend time getting a good sound. You'll probably have problems with a few other mics on the drumset picking up the hi-hats, particularly the snare drum mic and overhead mics. Some people don't bother miking the hi-hats for this reason.
Hi-hats often sound too trashy through the snare drum mic. If you mic hi-hats, make sure that the snare drum mic is picking up as little of the hi-hats as possible by placing it properly and/or using a noise gate (a dynamic processor use to filter unwanted noise).
You can use either a dynamic mic or, better yet, a small diaphragm condenser mic for the hi-hats. The dynamic mic gives you a trashier sound and the small diaphragm condenser mic produces a bright sound. You can work with either by adjusting the EQ. Try adding just a little bit (4dB or so) of a shelf EQ set at 10 kHz to add just a little sheen to the hi-hats.
Place the mic about 3 to 4 inches above the hi-hats and point it down. The exact placement of the mic is less important than the placement of the other instrument mics because of the hi-hats' tone. Just make sure your mic isn't so close that you hit it.
Compression isn't usually necessary when tracking the hi-hats unless you have a drummer whose volume level is inconsistent. In this case, try using the same snare drum settings.

Cymbals

You want to know one secret to the huge drum sound of Led Zeppelin's drummer, John Bonham? Finesse. He understood that the drums sound louder and bigger in a mix if the cymbals are quieter in comparison. So he played his cymbals softly and hit the drums pretty hard. This allowed the engineer to raise up the levels of the drums without having the cymbals drown everything else out. Absolutely brilliant.
Because the drums bleeding into the overhead mics is inevitable and the overhead mics are responsible for providing much of the drums' presence in a mix, playing the cymbals softly allows you to get more of the drums in these mics. This helps the drums sound bigger.
Ask (no, demand) that your drummer play the cymbals quieter. Also use smaller cymbals with a fast attack and a short decay. Doing these things creates a better balance between the drums and cymbals and makes the drums stand out more in comparison.
Small diaphragm condenser mics capture the cymbals' high frequencies well. You can mic the cymbals by placing mics about 6 inches above each cymbal or by using overhead mics set 1 to 3 feet above the cymbals.

The whole kit

Most of the time, you want to have at least one (but preferably two) ambient mics on the drums if for no other reason than to pick up the cymbals. These (assuming you use two mics) are called overhead mics and, as the name implies, they are placed above the drumset. The most common types of mics to use for overheads are large and small diaphragm condenser mics because they pick up the high frequencies in the cymbals and give the drumset's sound a nice sheen (brightness). You also may want to try a pair of ribbon mics to pick up a nice, sweet sound on the overheads.
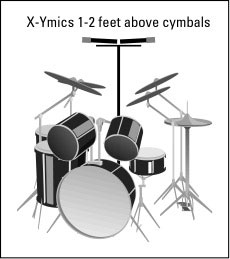
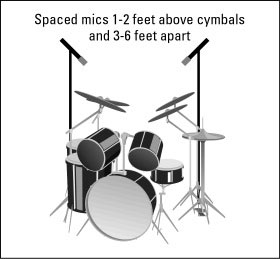
To mic the drumset with overhead mics, you can use either the X-Y coincident technique or spaced stereo pairs. Place them 1 to 2 feet above the cymbals, just forward of the drummer's head. Place X-Y mics in the center and set up spaced stereo pairs so that they follow the 3:1 rule (the mics should be set up 3 to 6 feet apart if they are 1 to 2 feet above the cymbals). This counters any phase problems. Point the mic down toward the drums and you're ready to record. Figure 4 shows both of these set-ups.
Mic set up for the cymbals

Mic Set up for Cymbals / Crashes

Figure 4: Overhead mics capture the cymbals and the drums.

Tuesday 28 August 2012

Large stereo tri-amped PA system.


Professional PA set up, Large PA set up diagram,PA setup

       With the exception of the compressors, the additions incorporated into this system are simply a doubling of the system components covered in previous examples. At this point, you should have a pretty good grasp of how to hook it all together, so rather than listing a lengthy step by step, I have listed a brief description of each addition included in this example.
Two Monitor Mixes
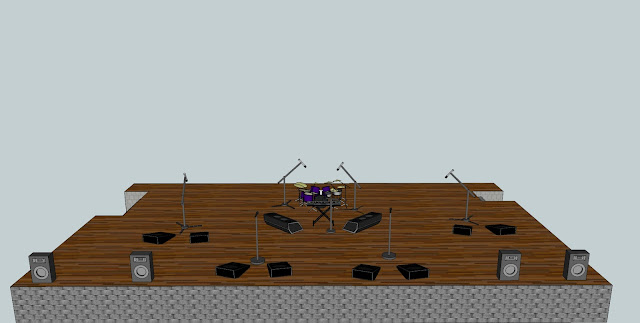
       Running more than one monitor mix can be very useful in that you can provide different monitor mixes for different parts of the stage. I have found that the drummer often wants to hear different things in the mix than the rest of the band. With two different monitor mixes, this is easily accomplished. Simply assign one monitor mix (channel A) to the drummer and another (channel B) to everyone else. This way you can adjust what the drummer hears independently of what everyone else on stage hears. In order to do this, your soundboard needs to be equipped with more than one monitor channel. These channels, usually designated as "Monitor A" and "Monitor B", will be controlled by separate knobs and will have separate outputs which must in turn be hooked into separate equalizers, amplifiers, and speakers.
Multiple Effects Loops
       The same concept applies to the effects loops. To hook up two effects loops in a mixer that is equipped for it, all you have to do is run one loop through "Effects A" and another separate loop through "Effects B". Some boards come equipped with several different available effects loops that may be labeled "Effects 1", "Effects 2",etc. Sometimes the effects will be labeled as "auxiliary". You can run as many separate effects loops as your mixer is equipped to handle provided that you have enough separate effects units to pull it off. One possible use for this set up is that you could assign nothing but a long delay (echo) to Aux 2 and your general effects to Aux 1. Then when a song required a long echo on a certain part, all you would have to do is turn up the slider or knob for Aux 2 to get your desired echo without changing to rest of the effects at the same time. Then when the echo wasn't needed anymore, you could simply turn the Aux 2 all the way down effectively removing that effect from the mix.
Note:
       The effects send, monitor out, and auxiliary out channels are essentially nothing more than specifically labeled line out channels. This means that as long as you pay close attention to where you plugged things in and you properly re-label your knobs, you can use them interchangeably. Usually, the only reason to do this would be to acquire another monitor mix in a board that is equipped with only one monitor channel but has an extra unused auxiliary channel. To avoid confusion, I would recommend doing this only as a last resort. Also, don't forget that in order for your effects to work, they must return to the soundboard to complete the effects loop.

Mains in Stereo
       Running two separate channels for the mains is what is known as running a stereo PA system. To do this, you need a stereo mixing board. This board will consist of two output channels for the mains. These will be labeled either "left" and "right" or "A" and "B". The sliders for each input channel on the board will control both channels simultaneously, but there will be a "pan" knob above each that will allow you to pan the volume from left to right just like the "balance" knob on your car stereo. The output sliders on the board will operate the outputs for channel "A" and "B" independently of one another. Hooking this system up is essentially the same as what you did when hooking up two monitor mixes. Simply run the left channel "A" out to it's own equalizer, crossover, amplifiers, and speakers, and then do the same for the right channel "B". This is where those stereo (two channel) components come in handy. For instance, you can hook the "left out" from the board into the channel "A" input of the equalizer and hook the "right out" from the board into the channel "B" input of the same stereo equalizer. This principal can be followed all the way through the crossover, and the amplifiers.
Note:
When using a stereo amplifier in this way, make sure the switch in the back is switched to "stereo" mode.

Compressors
       Compressors are an effect that is usually run in-line in the main signal path. They make a subtle change in the sound of the entire system that amounts to "taking the edge off". There are a lot of technical descriptions for what they do, but my best description is to say that they do just what the name implies. They squash (or compress) the sound together to create a more compact and clean sound. Be careful with these, they can be used for either good or evil. Set to a moderate level, they can add to the quality of your overall sound, but set too high, they can take the life right out of your performance. Honestly, I am not the biggest fan of compressors, but I think I am in the minority, so I felt I should incorporate them into at least one example.

The Snake

       At some point you may want to use a soundman to run sound from somewhere other than the stage. In order to get the board out in front of the stage and across the dance floor, you will need a PA snake.
Snake cable connections, Snake for PA, PA cable connections

       The PA snake is used like an extension cord that connects all of the things on and behind the stage to all the things the sound man will be using in the sound booth on the other side of the room. The snake should have at least as many low impedance (low Z) channels as your soundboard, and at least 2 to 4 high impedance (high Z) channels depending on whether you are running a stereo setup or not. When setting your system up this way, the soundboard should be placed at least 30 feet or farther out in front of the main speakers so that the sound engineer will be far enough away to get a clear idea of what is coming out of the system. Also, the equalizers, the compressors, and the effects should be located along side the soundboard while the amplifiers and the crossovers should be located on or behind the stage. The on stage end of the snake will be a big box with individually numbered High Z inputs and Low Z outputs. The end of the snake toward the sound booth will have high Z outputs and Low Z inputs with numbers corresponding the inputs and outputs on the stage end. The ends toward the sound booth will be loose and look like the ends of microphone or instrument cords.
       To properly hook up the snake, simply plug each of the loose low Z ends into the channel on the soundboard that corresponds with the number printed on that end, then plug all of your microphones on stage into their regularly assigned channels at the box end of the snake. For instance, the loose end marked "1" should be plugged into input channel number 1 of the soundboard. Then, on the stage you can plug microphone number 1 into the number 1 input on the box end of the snake thus assigning microphone number 1 to channel number 1 of the soundboard.
       The high Z inputs and outputs are there to provide an extension between the compressors (if you're using them. If not, insert the word EQ for the word "compressor") at the sound booth and the crossovers on the stage. To do this, simply plug one of the high Z loose ends of the snake into the output of the compressor, and then plug a cable between the corresponding high Z channel on the box end of the snake and the input of the crossover located on the stage. This same principle applies to both the monitor channels and the main channels.
- Source ( thefxcode.com)